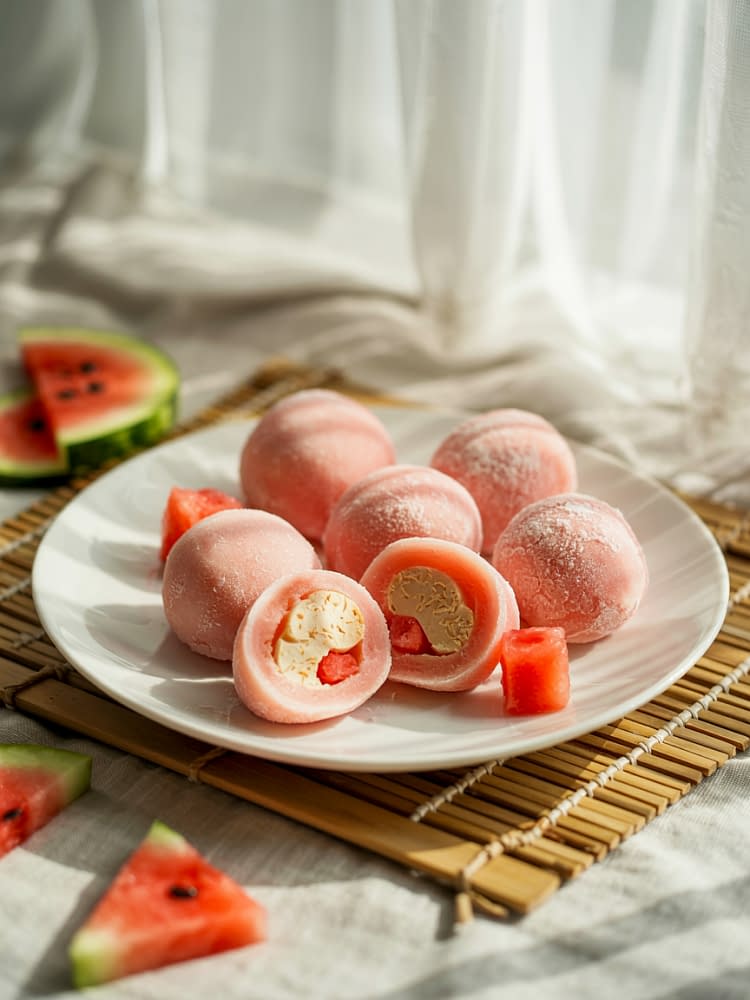

When the sun is blazing and you crave something cool yet satisfying, this Watermelon Mochi Recipe is the answer. Combining Japan’s beloved chewy rice cake texture with the refreshing sweetness of watermelon, this dessert perfectly balances softness, creaminess, and a burst of fruity freshness in every bite.
Unlike traditional mochi, which often features red bean paste or ice cream fillings, this modern version uses fresh fruit for a lighter, juicier experience. Each mochi ball wraps around a cube of chilled watermelon and a touch of whipped cream — resulting in a treat that’s as fun to eat as it is beautiful to look at.
If you’ve ever wanted to try making mochi at home, don’t worry — this guide walks you through everything, from ingredients and equipment to shaping and storing tips.
What Is Mochi?
Mochi (餅) is a traditional Japanese rice cake made from glutinous rice flour (mochiko), known for its signature soft, elastic texture. It’s a staple in Japanese cuisine, used in desserts like daifuku, ice cream, and even savory dishes like ozoni (New Year soup).
In the classic daifuku style, mochi is filled with red bean paste or fruits. The Watermelon Mochi Recipe takes this concept and turns it into a refreshing summer twist, pairing the chewy rice exterior with juicy fruit and creamy filling.
A dessert that’s:
- Naturally gluten-free
- Light yet satisfying
- Fun to make and even more fun to eat
Ingredients for Watermelon Mochi Recipe
Creating delicious mochi at home requires only a few pantry staples. Here’s a detailed breakdown:
For the Mochi Dough
- 1 cup glutinous rice flour (mochiko): The key ingredient for that stretchy, chewy texture.
- ¾ cup water: Helps form a smooth, sticky batter.
- ¼ cup granulated sugar: Adds light sweetness and balances the fruit flavor.
- 1 tbsp cornstarch: For dusting and easy handling.
For the Filling
- 1 cup fresh watermelon cubes (2–3 cm each): Choose seedless and ripe watermelon for the best flavor.
- ½ cup whipped cream: Lightly sweetened for a creamy texture that complements the fruit.
- ½ tsp vanilla extract (optional): Enhances the aroma and adds subtle depth.
For Dusting
- 2 tbsp potato starch or cornstarch: Prevents sticking during shaping.
Equipment You’ll Need
- Mixing bowls
- Whisk or spatula
- Steamer or microwave-safe bowl
- Silicone spatula
- Measuring cups and spoons
- Parchment paper
- Cooling rack or tray
- Knife and cutting board
Step-by-Step Guide to Making Watermelon Mochi
Step 1: Prepare the Watermelon Cubes
Start by cutting your watermelon into small, uniform cubes — roughly 2–3 cm each.
Make sure to remove any seeds. Pat them dry with paper towels to remove excess moisture, which can make the mochi soggy.
Next, place the cubes on a parchment-lined tray and freeze for about 20–25 minutes. The goal is to make them firm but not rock solid. This helps keep their shape while wrapping the mochi around them.
Step 2: Whip the Cream Filling
In a chilled bowl, whip your cream until it forms soft peaks. Add a small amount of sugar or vanilla if you prefer a slightly sweet flavor.
Keep the whipped cream refrigerated while you prepare the dough — it’s important that it stays cold and stable for easy assembly later.
Step 3: Mix the Mochi Dough
In a large microwave-safe or heatproof bowl, combine glutinous rice flour, sugar, and water. Whisk until smooth — no lumps should remain. The texture should resemble a thin batter.
This step is crucial for ensuring even cooking and a uniform chewy texture.
Step 4: Cook the Mochi Dough
Option 1: Steaming Method
- Pour the mixture into a heatproof dish, cover it loosely with foil, and steam for about 15 minutes at 100°C.
- Stir halfway through to ensure even cooking.
When done, the dough should be sticky, shiny, and slightly translucent.
Option 2: Microwave Method (Faster)
- Microwave on high (700–800W) for 1 minute. Stir with a wet spatula.
- Repeat in 30-second intervals until the dough thickens and becomes elastic.
The mochi dough is ready when it pulls away slightly from the sides of the bowl and looks glossy.
Step 5: Knead and Cool the Dough
Dust a clean surface or silicone mat with cornstarch or potato starch.
Transfer the hot dough onto the surface carefully — it will be sticky and hot. Let it cool slightly before kneading it gently for 1–2 minutes until smooth and pliable.
Avoid over-kneading; just enough to make it workable and soft.
Step 6: Portion and Flatten
Divide the dough into 8 equal portions using a knife or dough cutter. Roll each piece into a ball, then flatten it into a circular disc about 3–4 inches wide.
Tip: Dust your hands often to prevent sticking.
Step 7: Fill the Mochi
Now comes the fun part!
Take one mochi disc, place a small spoonful of whipped cream in the center, and add one frozen watermelon cube on top.
Carefully lift the edges of the mochi and bring them together to cover the filling. Pinch to seal the bottom tightly, then roll it gently into a smooth ball.
If the dough feels too sticky, dust your fingers lightly with cornstarch again.
Step 8: Chill Before Serving
Place all mochi balls seam-side down on parchment paper. Refrigerate for at least 30 minutes before serving. This helps the dough set and keeps the filling cool and creamy.
Tips for the Perfect Watermelon Mochi Recipe
- Use glutinous rice flour only: Regular rice flour won’t create the chewy texture.
- Freeze the watermelon: It prevents excess moisture and helps with clean wrapping.
- Keep everything cool: Warm whipped cream or fruit can melt and make assembly tricky.
- Don’t skip the starch dusting: It’s the key to smooth, non-sticky mochi.
- Eat fresh: Mochi tastes best the same day it’s made — soft, bouncy, and full of flavor.
Flavor Variations
Once you’ve mastered the basic Watermelon Mochi Recipe, you can experiment with fun twists:
- Strawberry Mochi: Replace watermelon with strawberries for a traditional Japanese version.
- Mango Cream Mochi: Use mango cubes and coconut whipped cream for a tropical flair.
- Matcha Watermelon Mochi: Add 1 tsp of matcha powder to the dough for a green tea twist.
- Chocolate Mochi: Dust the outside with cocoa powder for a unique finish.
Serving Suggestions
Watermelon mochi makes a stunning dessert for:
- Summer picnics or parties: Its light and fruity taste is perfect for hot weather.
- Tea time treats: Serve with green tea or jasmine tea for a refreshing balance.
- Dessert platters: Pair with fruit salad or ice cream for a creative presentation.
For a fun aesthetic, slice one mochi in half to show the colorful interior — a creamy white filling and vibrant red watermelon core surrounded by a soft pink shell.
Storage and Shelf Life
Mochi is best enjoyed fresh, but if you need to store it:
- Refrigerator: Store in an airtight container for up to 24 hours.
- Freezer: Can be frozen for up to one week. Let it thaw in the fridge for several hours before eating.
Avoid leaving mochi at room temperature for long periods, as it can become sticky and lose its chewiness.
Troubleshooting Common Problems
1. My mochi dough is too wet.
It may be undercooked. Continue steaming or microwaving in short intervals until it thickens.
2. My mochi is too hard after cooling.
Overcooking or using too much flour can cause stiffness. Make sure to measure accurately.
3. The dough tears while wrapping.
Your dough may be too cold or too dry. Warm it slightly with your hands before filling.
Final Thoughts
This Watermelon Mochi Recipe is more than just a dessert — it’s a summer experience. Every bite brings together the softness of chewy mochi, the cool sweetness of watermelon, and the creamy lightness of whipped filling.
It’s easy to make, fun to shape, and perfect for sharing with family and friends. Whether you’re new to Japanese desserts or looking for something unique to serve at your next summer gathering, this recipe will instantly impress.
Give it a try, and you’ll see why this fruity, chewy treat is quickly becoming one of the trendiest desserts of the season.
Watermelon Mochi Recipe — A Refreshing Summer Dessert
This Watermelon Mochi recipe brings summer sweetness to your kitchen with chewy, soft mochi wrapped around juicy watermelon pieces and a light cream filling. Perfectly refreshing and irresistibly cute, each bite combines the cool freshness of watermelon with the delicate chew of glutinous rice dough. This no-bake Japanese-inspired treat is ideal for hot days and easy to make at home — a must-try for dessert lovers who adore fruity, chewy sweets.
Ingredients
For the Mochi Dough
For the Filling
For Dusting
Instructions
Prepare the Watermelon Filling
- Cut the watermelon into small cubes, removing all seeds. Pat the cubes dry with a paper towel to remove excess moisture — this prevents the mochi from becoming soggy later. Place the cubes on a tray and freeze for 20–25 minutes until firm but not rock hard.
Whip the Cream
- In a chilled bowl, whip the cream until it forms soft peaks. Add vanilla extract if using. Keep it refrigerated while preparing the mochi dough.
Mix the Mochi Dough
- In a microwave-safe or heatproof bowl, combine glutinous rice flour, sugar, and water. Whisk until smooth and lump-free. The mixture should look like a thin batter.
Cook the Mochi
- Option 1 – Steaming:
- Pour the mixture into a heatproof dish, cover it loosely with foil, and steam over medium heat (100°C) for about 15 minutes. Stir halfway through to ensure even cooking.
- Option 2 – Microwave Method:
- Microwave the batter on high (700–800W) for 1 minute, stir, then repeat in 30-second intervals until thick and sticky. Once done, the dough will be glossy, elastic, and slightly translucent.
Knead and Cool the Dough
- Dust a clean surface with cornstarch or potato starch. Transfer the hot mochi dough onto it (be careful — it’s sticky!). Let it cool slightly, then gently knead and stretch for 1–2 minutes until smooth.
Portion and Flatten
- Divide the mochi into 8 equal portions. Flatten each piece into a small round disc (about 3–4 inches wide). Dust your hands frequently to prevent sticking.
Fill and Shape
- Place a small spoonful of whipped cream in the center of each mochi disc, then add one frozen watermelon cube on top. Carefully wrap the mochi around the filling, pinching the edges to seal. Gently roll it into a smooth ball, seam side down.
Chill and Serve
- Place the finished mochi balls in a parchment-lined container, seam side down. Refrigerate for 30 minutes before serving for the best texture.
Note
Storage: Store the mochi in an airtight container in the refrigerator for up to 1 day. Mochi tastes best when eaten fresh as it can harden over time.
Tip: Freezing the watermelon slightly helps it stay firm and makes wrapping easier.
Variations:
- Replace watermelon with other fruits like mango, strawberry, or kiwi for colorful alternatives.
- Add a few drops of natural food coloring (pink or green) to the dough for a fun, watermelon-inspired look.
Halal Note: This recipe contains no alcohol or haram ingredients.