
There is something undeniably comforting about a perfectly made cheesecake. Now imagine that same creamy richness, infused with real vanilla bean and transformed into easy-to-serve squares. This Vanilla Bean Cheesecake Squares Recipe delivers exactly that—an elegant dessert that feels luxurious yet remains approachable for home bakers.
Unlike traditional round cheesecakes, these squares are simpler to prepare, easier to portion, and ideal for gatherings. The balance between the buttery crust and the smooth, vanilla-speckled filling creates a dessert that is both visually appealing and deeply satisfying.
Whether you are preparing a dessert for a celebration, a casual get-together, or simply treating yourself, this recipe offers consistent, bakery-quality results with clear steps and reliable techniques.
Why You’ll Love This Recipe
A rich and creamy texture
The filling is smooth, dense, and perfectly creamy without being overly heavy. The addition of vanilla bean elevates the flavor profile, giving it a warm, aromatic depth.
Easy to slice and serve
Cheesecake squares are far more practical than traditional slices. They hold their shape well and are perfect for parties, gifting, or meal prep.
Balanced sweetness
This recipe avoids excessive sweetness, allowing the natural flavors of cream cheese and vanilla to shine through.
Beginner-friendly with professional results
Even though it looks sophisticated, this Vanilla Bean Cheesecake Squares Recipe is designed with simple steps that anyone can follow.
Understanding Vanilla Bean Flavor
What makes vanilla bean special
Vanilla bean offers a more complex and natural flavor compared to standard vanilla extract. It has floral, slightly smoky notes that enhance the richness of the cheesecake.
Vanilla bean vs vanilla extract
While vanilla extract is convenient, vanilla bean paste or fresh vanilla beans provide those signature black specks and a more intense flavor. If available, it is highly recommended to use real vanilla bean for this recipe.
Ingredients Overview
For the crust
Digestive biscuits
These create a firm yet crumbly base. You can also use graham crackers if preferred.
Butter
Melted butter binds the crumbs together and adds richness.
Sugar
A small amount enhances flavor without overpowering the crust.
For the cheesecake filling
Cream cheese
The main ingredient. Use full-fat cream cheese at room temperature for the best texture.
Sugar
Provides sweetness while keeping the flavor balanced.
Eggs
Eggs help set the cheesecake and give it structure.
Heavy cream
Adds smoothness and prevents the filling from becoming too dense.
Vanilla bean paste or fresh vanilla
The star of the recipe, responsible for the deep vanilla flavor.
Cornstarch
Helps stabilize the filling and reduces the chances of cracking.
Lemon juice
Adds a subtle brightness that balances the richness.
Step-by-Step Preparation Guide
Preparing your workspace
Before starting, ensure all ingredients are at room temperature. This step is crucial for achieving a smooth batter without lumps.
Making the crust
Crushing the biscuits
Use a food processor or a rolling pin to crush the biscuits into fine crumbs. The texture should resemble sand.
Mixing the base
Combine the crumbs with melted butter and sugar. The mixture should hold together when pressed.
Pressing into the pan
Firmly press the mixture into a lined square baking pan. Make sure the layer is even and compact.
Pre-baking
Bake the crust briefly to set it. This step prevents it from becoming soggy once the filling is added.
Preparing the cheesecake filling
Beating the cream cheese
Start by beating the cream cheese until completely smooth. This is one of the most important steps to avoid lumps.
Adding sugar
Mix in the sugar gradually until fully incorporated.
Incorporating eggs
Add eggs one at a time, mixing gently. Overmixing at this stage can introduce too much air, which may cause cracks.
Enhancing the flavor
Adding vanilla bean
Stir in the vanilla bean paste or scraped seeds. You should see tiny specks throughout the mixture.
Adding cream and stabilizers
Mix in heavy cream, cornstarch, and lemon juice until the batter becomes silky and uniform.
Baking the cheesecake
Pouring the filling
Pour the mixture over the pre-baked crust and smooth the top.
Removing air bubbles
Gently tap the pan on the counter to release trapped air.
Baking process
Bake at a low temperature to ensure even cooking. The edges should be set while the center remains slightly soft.
Cooling and chilling
Cooling at room temperature
Allow the cheesecake to cool gradually. Sudden temperature changes can cause cracks.
Refrigeration
Chill for several hours or overnight. This step is essential for achieving clean slices and the perfect texture.
Cutting into squares
Use a sharp knife and wipe it clean between cuts. This ensures neat, professional-looking squares.
Expert Tips for Perfect Cheesecake Squares
Use room temperature ingredients
Cold ingredients can lead to a lumpy batter and uneven texture.
Avoid overmixing
Too much mixing introduces air, which can cause the cheesecake to rise and crack.
Bake at a low temperature
A gentle bake ensures even cooking and prevents overbrowning.
Do not overbake
The center should still jiggle slightly when removed from the oven.
Chill thoroughly
Patience is key. Proper chilling improves both texture and flavor.
Flavor Variations
Chocolate swirl cheesecake squares
Add melted chocolate and swirl it into the batter before baking.
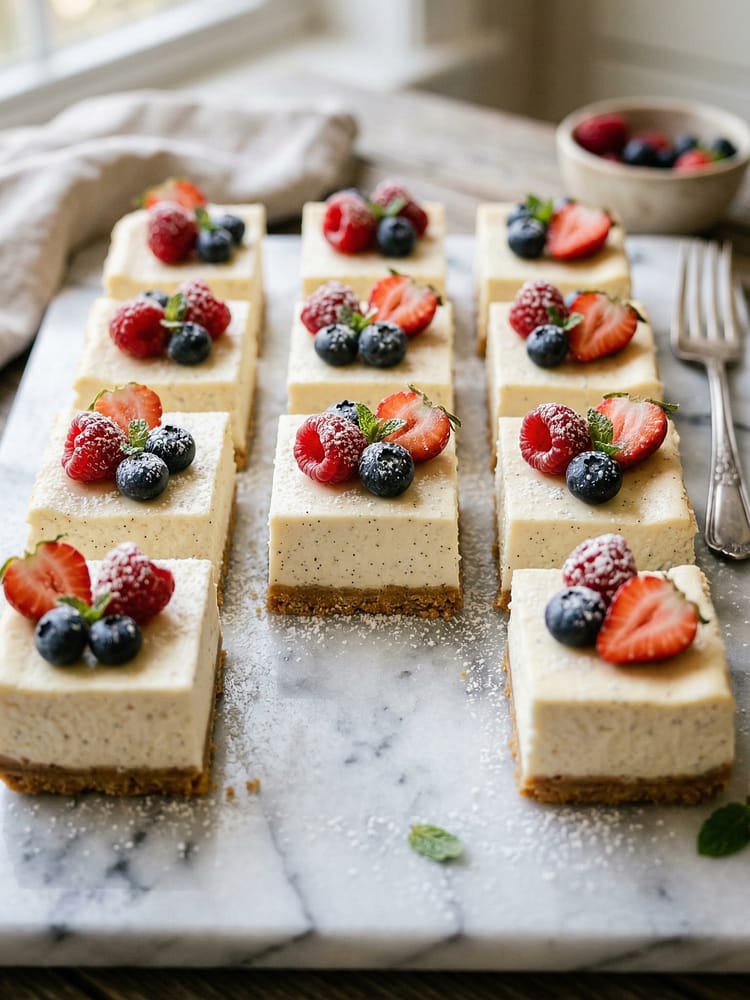
Berry-topped cheesecake squares
Top with fresh strawberries, blueberries, or raspberry compote for a refreshing contrast.
Lemon vanilla cheesecake squares
Increase the lemon juice slightly for a brighter flavor.
Nutty crust variation
Replace part of the biscuit crumbs with finely ground nuts for added texture.
Serving Suggestions
Classic presentation
Serve chilled squares with a light dusting of powdered sugar.
With fresh fruits
Pair with seasonal fruits to add color and freshness.
With whipped cream
A dollop of lightly sweetened whipped cream enhances the dessert without overpowering it.
As a party dessert
Cut into smaller bite-sized pieces for easy serving at gatherings.
Storage and Make-Ahead Tips
Refrigeration
Store in an airtight container in the refrigerator for up to four days.
Freezing
Wrap individual squares and freeze for up to two months. Thaw in the refrigerator before serving.
Make-ahead option
This Vanilla Bean Cheesecake Squares Recipe is ideal for preparing a day in advance, making it perfect for events and special occasions.
Common Mistakes to Avoid
Skipping the pre-bake for the crust
This can lead to a soft or soggy base.
Using cold ingredients
Results in uneven mixing and a grainy texture.
Overbaking
Leads to a dry and crumbly cheesecake.
Cutting too early
Warm cheesecake will not hold its shape properly.
Nutritional Insight
While cheesecake is an indulgent dessert, enjoying it in moderate portions allows you to appreciate its richness without overdoing it. The use of quality ingredients ensures better flavor, meaning smaller servings are often more satisfying.
Conclusion
This Vanilla Bean Cheesecake Squares Recipe brings together simplicity and elegance in one dessert. The creamy filling, infused with real vanilla bean, paired with a buttery crust, creates a dessert that feels both comforting and refined.
With clear steps, helpful tips, and versatile variations, this recipe is designed to help you achieve consistent, high-quality results every time. Whether you are baking for a special occasion or simply enjoying a homemade treat, these cheesecake squares are sure to impress.
Once you try them, they may quickly become one of your favorite go-to desserts.
Vanilla Bean Cheesecake Squares Recipe
These Vanilla Bean Cheesecake Squares are rich, creamy, and perfectly balanced with a buttery crust and real vanilla bean flavor. This easy-to-follow dessert recipe delivers bakery-quality cheesecake bars that are ideal for parties, gatherings, or simple indulgence at home.
Ingredients
For the Crust
For the Cheesecake Filling
Optional Topping
Instructions
Prepare the Baking Pan
-
Line a square baking pan (8x8 inch) with parchment paper, leaving some overhang on the sides. This will help you easily lift out the cheesecake later. Lightly grease the sides for smooth removal.
Make the Crust
-
In a bowl, combine crushed digestive biscuits, melted butter, and sugar. Mix until the texture resembles wet sand. Press this mixture firmly into the bottom of the prepared pan using the back of a spoon or a flat glass.
-
Bake at 160°C for 10 minutes, then set aside to cool slightly.
Prepare the Cheesecake Filling
-
In a large mixing bowl, beat the cream cheese until smooth and creamy with no lumps. Add sugar and mix until fully combined.
-
Add eggs one at a time, mixing gently after each addition. Avoid overmixing to prevent air bubbles.
Add Flavor and Creaminess
-
Mix in heavy cream, vanilla bean paste, vanilla extract, cornstarch, and lemon juice. Stir until the mixture is smooth, silky, and evenly combined. The batter should be thick but pourable.
Assemble the Cheesecake
-
Pour the cheesecake filling over the pre-baked crust. Tap the pan gently on the counter to release any trapped air bubbles and level the surface.
Bake the Cheesecake
-
Bake at 160°C for 35–45 minutes. The edges should be set, while the center remains slightly jiggly. Avoid overbaking, as this can cause cracks and dryness.
Cool and Chill
-
Allow the cheesecake to cool at room temperature for about 1 hour. Then transfer it to the refrigerator and chill for at least 4–5 hours, or overnight for best results.
Slice and Serve
-
Once fully chilled, lift the cheesecake out using the parchment paper. Cut into even squares using a sharp knife (wipe the knife clean between cuts for neat edges).
-
Top with whipped cream, fresh berries, or a light dusting of powdered sugar if desired.
Note
Always use room temperature ingredients for a smooth filling. Do not overmix the batter to avoid cracks in the cheesecake. For cleaner slices, chill overnight and use a warm knife. You can substitute digestive biscuits with graham crackers. Store in an airtight container in the refrigerator for up to 4 days.


