
Red velvet marble waffles are the kind of breakfast that instantly feels special. They combine the soft, lightly cocoa-flavored richness of red velvet with classic vanilla waffle batter, swirled together to create a striking marble effect. These waffles are not only visually impressive but also surprisingly easy to make at home, even if you are not an experienced baker.
This recipe is perfect for slow weekend breakfasts, brunch gatherings, Valentine’s Day mornings, or anytime you want to turn an ordinary meal into something memorable. In this guide, you will learn everything you need to know about making red velvet marble waffles from scratch, including ingredient choices, preparation steps, texture tips, flavor variations, and serving ideas.
Whether you are cooking for family, guests, or simply treating yourself, this detailed guide will help you create waffles that look bakery-worthy while tasting soft, balanced, and comforting.
What Makes Red Velvet Marble Waffles Special
Red velvet marble waffles stand out because they offer two flavors and textures in one bite. The vanilla waffle base is light and slightly crisp on the outside, while the red velvet portion brings a gentle cocoa note and eye-catching color.
Unlike traditional red velvet desserts that rely heavily on frosting, these waffles are designed to be balanced and not overly sweet. The marble effect ensures that each waffle looks unique, making them ideal for sharing on social media or serving at brunch tables.
Another reason these waffles are so appealing is their versatility. You can dress them up with whipped cream and berries for a dessert-style breakfast or keep them simple with honey or maple syrup for a cozy morning meal.
Ingredients Overview
Understanding the role of each ingredient helps you achieve the best possible texture and flavor.
Dry Ingredients
The flour forms the structure of the waffles, while baking powder ensures they rise properly and remain fluffy. Sugar adds a subtle sweetness, and a small amount of cocoa powder gives the red velvet batter its signature depth.
Wet Ingredients
Milk provides moisture and softness, eggs help bind everything together, and melted butter adds richness. Vanilla extract enhances the overall flavor, while vinegar in the red velvet portion reacts with the baking powder to create a tender crumb.
Food Coloring
Red food coloring gives the waffles their iconic look. Using a halal-certified coloring is recommended. Gel food coloring works best because it delivers strong color without thinning the batter.
Preparing the Batter
Mixing the Base Batter
Start by combining all dry ingredients in a large bowl. Whisk thoroughly to distribute the baking powder evenly. In a separate bowl, mix the wet ingredients until smooth. Slowly combine the wet mixture with the dry ingredients, mixing gently to avoid overworking the batter.
The goal is a smooth but slightly thick batter. Small lumps are normal and actually help keep the waffles tender.
Creating the Red Velvet Batter
Once the base batter is ready, set aside a portion and mix it with cocoa powder, food coloring, milk, and vinegar. Stir until the color is even and the texture matches the vanilla batter as closely as possible.
Keeping both batters at a similar consistency ensures that they cook evenly and swirl beautifully.
Marbling Technique Explained
Why Marbling Matters
The marble effect is what gives red velvet marble waffles their signature look. It ensures that every waffle has a mix of red velvet and vanilla rather than separating into layers.
How to Achieve the Perfect Swirl
Pour vanilla batter into the waffle iron first, then add spoonfuls of red velvet batter on top. Use a skewer or knife to gently swirl the two batters together. Avoid overmixing, as this can blur the colors and remove the contrast.
Cooking the Waffles
Preheat your waffle iron thoroughly before adding batter. A properly heated waffle iron helps create crisp edges while keeping the inside soft.
Cook the waffles until steam stops escaping and the surface is golden with visible red swirls. Cooking time may vary depending on your waffle iron, but most waffles take three to four minutes.
Texture and Flavor Tips
Getting Crispy Edges
For crispier waffles, lightly grease the waffle iron and avoid opening it too early. Letting the waffles cook fully ensures a golden exterior.
Keeping the Inside Soft
Do not overmix the batter, and avoid pressing the waffle iron down too hard. This preserves air pockets that keep the waffles fluffy.
Balancing Sweetness
Red velvet marble waffles should be mildly sweet. Toppings like syrup, fruit, or cream can add sweetness without overwhelming the base flavor.
Variations to Try
Chocolate Chip Red Velvet Marble Waffles
Add small chocolate chips to the red velvet batter for extra richness.
Cream Cheese Swirl Waffles
Mix a lightly sweetened cream cheese filling and swirl it into the batter before cooking.
Whole Wheat Version
Use half whole wheat flour and half all-purpose flour for a slightly nuttier flavor.
Egg-Free Option
Use a plant-based milk and a suitable egg substitute to adapt the recipe for egg-free diets.
Serving Suggestions
Red velvet marble waffles can be served in many ways depending on the occasion.
Classic Breakfast Style
Serve warm with butter and maple syrup or honey.
Brunch Presentation
Top with whipped cream, fresh berries, and a dusting of powdered sugar for an elegant brunch plate.
Dessert-Inspired Serving
Add vanilla ice cream, chocolate drizzle, or cream cheese glaze for a dessert-style waffle.
Make-Ahead and Storage Tips
Storing Leftovers
Allow waffles to cool completely before storing. Keep them in an airtight container in the refrigerator for up to three days.
Freezing Instructions
Place cooled waffles in a freezer-safe bag with parchment paper between layers. Freeze for up to one month.
Reheating
Reheat waffles in a toaster or oven to restore crispness. Avoid microwaving, as it can make them soggy.
Common Mistakes to Avoid
Overmixing the batter can lead to dense waffles. Using too much food coloring can affect flavor. Not preheating the waffle iron properly may result in uneven cooking.
Why This Recipe Works
This red velvet marble waffles recipe is carefully balanced to deliver flavor, texture, and visual appeal without unnecessary complexity. The separation of batters allows you to control color and cocoa intensity, while the marbling technique ensures a beautiful finish every time.
Final Thoughts
Red velvet marble waffles are more than just a breakfast recipe. They are a way to turn simple ingredients into something joyful and memorable. With the right technique and attention to detail, you can create waffles that look stunning, taste balanced, and feel special without being difficult.
Whether you make them for a weekend treat, a celebration, or just because, these waffles are sure to become a favorite in your kitchen.
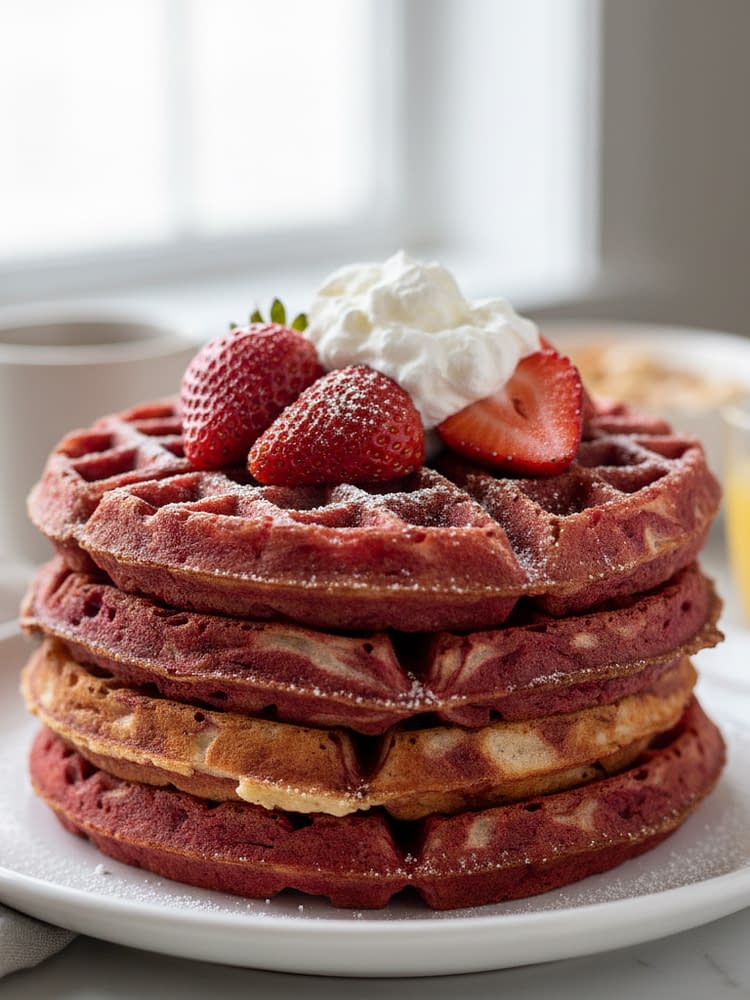
Red Velvet Marble Waffles Recipe
These Red Velvet Marble Waffles are soft, fluffy breakfast waffles with beautiful red-and-vanilla swirls and a subtle cocoa flavor. Perfect for brunch, special mornings, or Valentine’s Day, this easy waffle recipe combines classic red velvet taste with crisp waffle edges for a visually stunning and delicious treat.
Ingredients
For the Vanilla Waffle Batter
For the Red Velvet Batter
Optional Toppings
Instructions
Prepare the Dry Ingredients
- In a large mixing bowl, whisk together the flour, sugar, baking powder, and salt until evenly combined. This ensures light and fluffy waffles.
Mix the Wet Ingredients
- In a separate bowl, whisk the milk, egg, melted butter, and vanilla extract until smooth and fully combined.
Combine the Batter
- Gradually pour the wet ingredients into the dry ingredients. Gently whisk until just combined. Do not overmix; a few small lumps are fine.
Create the Red Velvet Batter
- Scoop 0.5 cup of the prepared batter into a small bowl. Add cocoa powder, milk, red food coloring, and vinegar. Mix until smooth and evenly colored.
Preheat the Waffle Iron
- Preheat your waffle iron according to manufacturer instructions and lightly grease it with oil or butter.
Marble the Batter
- Pour vanilla batter into the waffle iron first. Add spoonfuls of red velvet batter on top. Use a skewer or knife to gently swirl the batters together for a marble effect.
Cook the Waffles
- Close the waffle iron and cook for 3–4 minutes, or until the waffles are crisp on the outside and cooked through.
Serve Warm
- Carefully remove the waffles and serve immediately with your favorite toppings.
Note
Use gel food coloring for deeper red color without thinning the batter.
Do not over-swirl the batter; light swirls create the best marble pattern.
Store leftover waffles in an airtight container in the refrigerator for up to 3 days.
Freeze waffles for up to 1 month and reheat in a toaster or oven.
For a richer taste, serve with cream cheese glaze or vanilla yogurt.