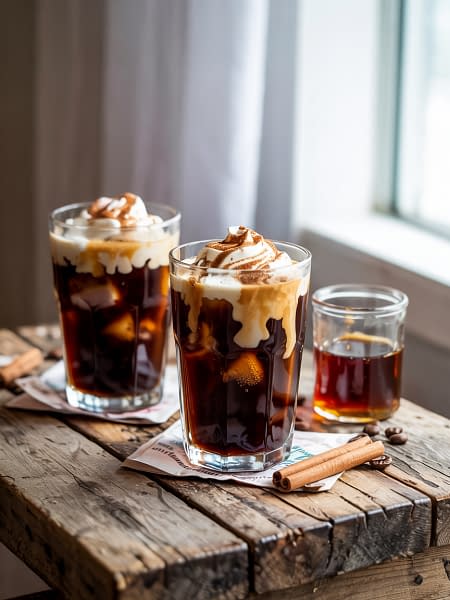

The Protein Iced Coffee Shake Recipe is more than a simple blended drink. It combines the energizing effect of coffee with the long-lasting satisfaction of protein, making it ideal for busy mornings, light breakfasts, or recovery after exercise.
Many people rely on iced coffee for a quick caffeine boost, but plain coffee often leaves you hungry shortly afterward. This recipe solves that problem by adding protein, natural carbohydrates, and healthy fats. The result is steady energy, better focus, and a drink that actually keeps you full.
For beginners, this recipe is especially appealing because it requires no cooking, minimal equipment, and only a few easy-to-find ingredients. Once you learn the basics, you can customize it endlessly to suit your taste and dietary needs.
What Is a Protein Iced Coffee Shake
A protein iced coffee shake is a cold blended beverage that combines brewed coffee with protein powder and creamy ingredients such as milk, fruit, or nut butter. It sits between an iced latte and a smoothie, offering the bold flavor of coffee with added nutrition.
Unlike café-style iced drinks that often contain large amounts of sugar, the Protein Iced Coffee Shake Recipe focuses on balance. It delivers caffeine for alertness, protein for fullness, and optional natural sweetness for flavor without excess calories.
Benefits of the Protein Iced Coffee Shake Recipe
Balanced Energy Without a Crash
One of the biggest advantages of the Protein Iced Coffee Shake Recipe is how it delivers energy in a steady and controlled way. Regular iced coffee provides caffeine, which can wake you up quickly, but it often causes a sudden drop in energy later. This happens because caffeine alone stimulates the nervous system without providing lasting fuel.
In this recipe, protein plays an important role. Protein slows digestion and helps stabilize blood sugar levels. When caffeine and protein are consumed together, the energy release becomes smoother and more balanced. Instead of feeling jittery or experiencing an energy crash after a few hours, you are more likely to feel alert, focused, and steady for a longer period. This makes the shake ideal for mornings, work hours, or long study sessions.
Supports Muscle Recovery
Protein is essential for repairing and rebuilding muscle tissue, especially after physical activity. When you exercise, small muscle fibers break down, and protein helps repair them so they become stronger over time.
Drinking the Protein Iced Coffee Shake Recipe after a workout provides your body with protein in an easy-to-digest form. The liquid texture allows nutrients to be absorbed faster compared to heavy meals. At the same time, the cold temperature helps refresh and rehydrate the body. This combination makes the shake a convenient post-workout option, especially when you don’t feel like eating solid food immediately.
Keeps You Full Longer
Plain iced coffee does not contain nutrients that promote fullness. As a result, hunger often returns quickly. This recipe is different because it includes protein, fiber from banana, and healthy fats from nut butter.
Protein takes longer to digest than carbohydrates, while fiber slows down the absorption of sugars. Healthy fats further delay digestion, helping you feel satisfied for a longer period. Together, these nutrients reduce unnecessary snacking and help control appetite. For beginners trying to manage hunger or replace a light meal, this shake can be a practical and satisfying option.
Quick and Beginner-Friendly
The Protein Iced Coffee Shake Recipe is designed to be simple and accessible. There is no cooking involved, no complicated techniques, and no special skills required. Everything is prepared in one blender, which reduces cleanup and preparation time.
From start to finish, the process usually takes about five minutes. This makes it perfect for people with busy schedules or those who are new to making homemade drinks. Even if you have never made a smoothie or protein shake before, the steps are easy to follow and forgiving.
Ingredient Breakdown and Why Each One Matters
Brewed Coffee
Brewed coffee is the base of the recipe and provides its signature flavor and caffeine content. Using cooled coffee or cold brew is important because hot coffee will melt the ice too quickly and water down the shake.
Cold brew is especially beginner-friendly because it tends to be smoother and less acidic. If using regular brewed coffee, allowing it to cool fully helps maintain a rich, bold coffee taste without bitterness.
Milk
Milk adds creaminess and helps balance the natural bitterness of coffee. Dairy milk creates a rich and smooth texture, while plant-based options like almond, oat, or soy milk offer lighter or slightly sweeter alternatives.
Oat milk creates a café-style creaminess, almond milk keeps the shake lighter, and soy milk adds extra protein. Beginners can experiment to find which milk best suits their taste and dietary needs.
Protein Powder
Protein powder is what transforms this drink from iced coffee into a complete, nourishing shake. It helps keep you full and supports muscle maintenance.
Vanilla protein powder adds subtle sweetness and blends easily with coffee flavors. Unflavored protein powder keeps the coffee taste more dominant. Beginners should start with one level scoop to avoid an overly thick or chalky texture.
Banana
Banana provides natural sweetness and helps create a smooth, thick texture without needing ice cream or sugar. It also adds fiber and natural carbohydrates, which support energy levels.
Using a frozen banana improves consistency and keeps the shake cold without relying too heavily on ice. This is especially helpful for beginners aiming for a creamy result.
Nut Butter
Peanut butter or almond butter adds healthy fats and a mild nutty flavor that pairs well with coffee. It also increases satiety, helping you feel full for longer.
Even a small amount can significantly improve texture and richness. Beginners should measure carefully, as too much can overpower the coffee flavor.
Sweetener
Sweeteners like honey or maple syrup are optional and depend on personal taste. Coffee bitterness varies depending on brew strength, so beginners may prefer a small amount of sweetness at first.
It is best to add sweetener gradually and taste as you go rather than adding too much at once.
Vanilla Extract
Vanilla extract enhances aroma and smooths out sharp flavors. It adds depth without making the shake taste overly sweet or artificial.
Ice
Ice controls the temperature and thickness of the shake. More ice creates a thicker texture, while less ice results in a smoother, more drinkable consistency.
Equipment You Will Need
A blender, preferably high-speed, for smooth blending
Measuring cups and spoons for accurate portions
A coffee maker or instant coffee setup
A tall serving glass for presentation
Step-by-Step Instructions
Step 1: Brew and Cool the Coffee
Start by preparing your coffee using any method you are comfortable with, such as a drip coffee maker, French press, or instant coffee. Once the coffee is brewed, it is very important to let it cool completely before using it in the shake.
Hot or warm coffee will melt the ice immediately, which results in a watery texture and weak coffee flavor. For best results, brew the coffee at least 30 minutes in advance and place it in the refrigerator. Many beginners find it helpful to brew coffee the night before and store it in a covered container. This not only saves time in the morning but also ensures a strong, chilled base for the shake.
If you prefer a smoother taste with less bitterness, cold brew coffee is an excellent option and works perfectly in this recipe.
Step 2: Add Liquids to the Blender
Once the coffee is fully cooled, pour it into the blender first, followed by the milk. Adding liquids before solid ingredients helps the blender blades move freely and prevents ingredients from sticking to the bottom.
This step may seem simple, but it plays a big role in achieving a smooth consistency, especially for beginners. When liquids are added first, protein powder blends more evenly and reduces the chance of clumps forming. This also protects your blender motor and makes blending faster and easier.
Step 3: Add Protein and Flavorings
Next, add the protein powder, vanilla extract, and any optional sweetener you are using. Make sure the protein powder scoop is level, not heaped. Adding too much protein powder can make the shake overly thick and give it a chalky texture, which many beginners find unpleasant.
Vanilla extract enhances the overall flavor and softens the bitterness of coffee. If you are adding honey or maple syrup, start with a small amount. You can always add more later, but it is difficult to fix a shake that is too sweet.
Step 4: Add Banana, Nut Butter, and Ice
Add the frozen banana pieces, nut butter, and ice cubes to the blender. Breaking the banana into smaller chunks before freezing or adding helps it blend more smoothly and prevents large pieces from remaining in the shake.
The nut butter adds richness and healthy fats, while ice controls the thickness and temperature. Beginners should start with fewer ice cubes and increase gradually to avoid an overly thick or icy texture.
Step 5: Blend Until Smooth
Secure the blender lid and blend on high speed for 30 to 45 seconds. The shake should become creamy, smooth, and evenly blended with no visible chunks of ice or banana.
If your blender struggles, stop halfway, scrape down the sides with a spatula, and blend again. Avoid blending for too long, as excessive blending can warm the shake and thin the texture.
Step 6: Adjust Texture and Taste
After blending, check the consistency and flavor. If the shake is too thick, add a small splash of milk and blend for a few seconds. If it is too thin, add more ice or a few pieces of frozen banana.
Taste the shake and adjust sweetness if needed. Beginners often need a little time to find their preferred balance between coffee bitterness and sweetness, so this step is essential.
Step 7: Serve Immediately
Pour the shake into a tall, chilled glass and serve immediately. The shake tastes best when it is cold, thick, and freshly blended. If desired, add toppings such as cocoa powder or a light dusting of cinnamon for extra flavor.
Flavor Variations to Try
Chocolate Protein Iced Coffee Shake
For a chocolate-flavored version, add cocoa powder or use chocolate protein powder. This creates a mocha-style drink that feels indulgent while still being nutritious. Beginners should start with a small amount of cocoa to avoid overpowering the coffee flavor.
Vanilla Latte Style Shake
Use vanilla protein powder and oat milk to recreate a creamy café-style latte. Oat milk adds natural sweetness and a smooth texture that works especially well with coffee.
Naturally Sweetened Date Version
Replace honey or maple syrup with one or two pitted dates. Dates provide natural sweetness along with fiber and minerals. Make sure they are soft for easier blending.
Vegan Protein Iced Coffee Shake
Use plant-based protein powder and non-dairy milk such as soy, almond, or oat milk. Soy milk is especially good for beginners because it provides extra protein and a creamy texture.
Low-Calorie Version
Skip the nut butter and use unsweetened almond milk. This version keeps the shake light while still delivering protein and caffeine.
Serving Suggestions
The Protein Iced Coffee Shake can be enjoyed in different ways depending on your needs. It works well as a quick breakfast replacement when paired with something light, such as fruit or toast. After workouts, it helps replenish energy and support muscle recovery. In the afternoon, it can replace sugary snacks and help maintain focus. If consumed before exercise, allow enough time for digestion to avoid discomfort.
Storage and Make-Ahead Tips
Although the shake tastes best when freshly made, it can be prepared ahead if needed. Store it in an airtight container or bottle in the refrigerator for up to 12 hours. Natural separation may occur, which is normal. Shake well or blend briefly before drinking.
Avoid adding ice if you plan to store the shake. Add ice only right before serving to maintain proper texture and flavor.
Common Beginner Mistakes
Using Hot Coffee
Hot coffee melts ice instantly and waters down the shake. Always allow coffee to cool fully before blending.
Adding Too Much Protein Powder
More protein is not always better. Excess protein powder creates a thick, gritty texture that can ruin the drink.
Over-Blending
Blending for too long warms the shake and makes it thinner. Blend only until smooth.
Skipping Taste Adjustments
Always taste the shake before serving. Adjust sweetness, thickness, and flavor as needed.
Conclusion
The Protein Iced Coffee Shake Recipe is a simple yet powerful way to combine flavor, nutrition, and convenience in one refreshing drink. It takes the familiar comfort of iced coffee and turns it into something more satisfying by adding protein, natural sweetness, and creamy texture. For beginners, this recipe is especially approachable because it requires no cooking skills, no complicated tools, and very little time.
From busy mornings to post-workout recovery or afternoon energy slumps, this shake fits naturally into everyday life. It provides steady energy without the crash, helps keep you full longer, and offers a practical alternative to sugary coffee drinks. By following the detailed steps and tips shared in this guide, even complete beginners can confidently create a smooth, balanced, and delicious shake every time.
With practice, this recipe can become a reliable staple in your routine, supporting both your energy levels and nutritional goals while still letting you enjoy the rich taste of coffee you love.
Protein Iced Coffee Shake Recipe
This Protein Iced Coffee Shake is a refreshing, energizing beverage made with chilled coffee, high-quality protein, and creamy ingredients. Perfect for busy mornings or post-workout fuel, this shake delivers a smooth coffee flavor with a protein boost to keep you full, focused, and energized throughout the day.
Ingredients
For the Coffee Shake Base
Optional Toppings
Instructions
Prepare the Coffee
- Brew your coffee ahead of time and allow it to cool completely. Using hot coffee will melt the ice and dilute the shake, so chilled or cold brew coffee works best for a thick, creamy texture.
Add Ingredients to Blender
- Pour the cooled coffee into a high-speed blender. Add milk, protein powder, frozen banana, nut butter, sweetener (if using), vanilla extract, and ice cubes.
Blend Until Smooth
- Blend on high speed for 30–45 seconds, or until the shake becomes completely smooth and creamy. Scrape down the sides if needed to ensure everything is well combined.
Adjust Consistency
- If the shake is too thick, add a splash of milk. If it’s too thin, add a few more ice cubes or half a frozen banana and blend again.
Serve Immediately
- Pour the protein iced coffee shake into a tall chilled glass. Add optional toppings if desired and serve immediately for the best flavor and texture.
Note
- For a stronger coffee flavor, use cold brew instead of regular coffee.
- For a low-calorie version, skip nut butter and use unsweetened almond milk.
- To make it vegan, use plant-based protein powder and non-dairy milk.
- This shake is best enjoyed fresh but can be stored in the refrigerator for up to 12 hours in a sealed bottle. Shake well before drinking.