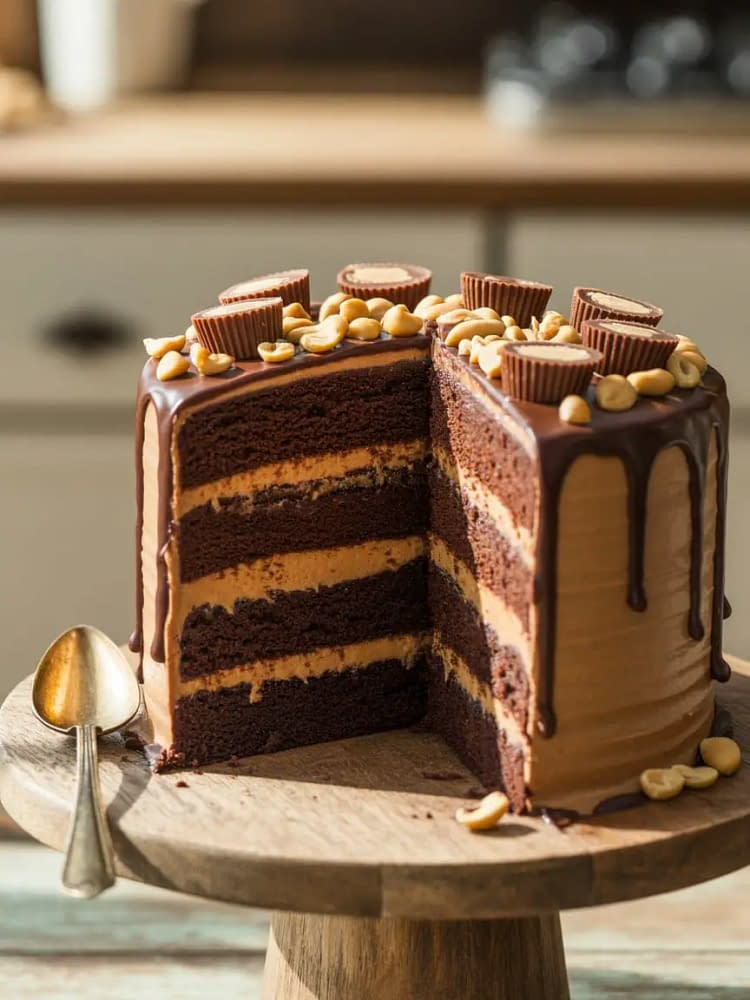

Chocolate and peanut butter. Is there any better duo in the dessert world? Whether you’re a seasoned baker or an enthusiastic home cook, this Peanut Butter Chocolate Layer Cake is a recipe that delivers both wow-factor and unforgettable flavor. With its moist chocolate sponge, silky peanut butter frosting, and glossy ganache topping, it’s more than just a cake—it’s a centerpiece, a conversation starter, and a deeply satisfying treat for anyone who takes a bite.
In this post, you’ll find everything you need to create this layered masterpiece at home. From ingredients and step-by-step instructions to pro tips and creative variations, we’re diving deep into how to perfect every element of this Peanut Butter Chocolate Layer Cake. Let’s get baking!
Why You’ll Love This Peanut Butter Chocolate Layer Cake
This cake isn’t just delicious—it’s balanced, rich, and built with texture in mind.
- Moist & fluffy chocolate layers: Made with cocoa powder and hot water for deep flavor and soft crumb.
- Light yet rich peanut butter frosting: Sweetened just right, whipped for a fluffy consistency.
- Ganache topping: Silky and decadent, it seals the deal.
- Crunchy peanut garnish: A bit of texture that makes every bite interesting.
Whether it’s a birthday, a holiday gathering, or just a weekend bake, this cake suits every occasion.
Ingredients Breakdown
To build the perfect Peanut Butter Chocolate Layer Cake, you’ll need three main components: the cake layers, the peanut butter frosting, and the chocolate ganache.
1. Chocolate Cake Layers
These layers are soft, rich, and not too sweet—a great base for the sweeter peanut butter frosting.
You’ll Need:
- 2 cups all-purpose flour (sifted)
- 1¾ cups granulated sugar
- ¾ cup unsweetened cocoa powder
- 1½ tsp baking powder
- 1½ tsp baking soda
- 1 tsp salt
- 2 large eggs (room temp)
- 1 cup whole milk
- ½ cup vegetable oil
- 2 tsp vanilla extract
- 1 cup hot water (or brewed coffee for deeper flavor)
Pro Tip: The batter will be thin. This is normal and ensures a moist crumb after baking.
2. Peanut Butter Frosting
Sweet, nutty, and creamy—this frosting is the star of the show.
You’ll Need:
- 1½ cups creamy peanut butter (avoid natural peanut butter)
- 1 cup unsalted butter (softened)
- 3½ cups powdered sugar (sifted)
- ¼ cup heavy cream (or whole milk)
- 1½ tsp vanilla extract
- A pinch of salt (optional, for contrast)
Pro Tip: Don’t skimp on the mixing time. Whipping the frosting gives it a light and airy texture.
3. Chocolate Ganache Topping
A glossy chocolate finish that elevates both the look and taste of the cake.
You’ll Need:
- ¾ cup heavy cream
- 170g dark or semi-sweet chocolate (chopped)
- 1 tbsp unsalted butter (for shine)
Optional Garnishes
- ¼ cup roasted peanuts (chopped)
- Mini peanut butter cups (halved)
Step-by-Step Instructions
Step 1: Prep Your Pans & Oven
Start by preheating your oven to 175°C (350°F). Grease and line three 8-inch round cake pans with parchment paper to ensure easy removal.
Step 2: Make the Chocolate Cake Batter
In a large bowl, whisk together your dry ingredients: flour, sugar, cocoa, baking powder, baking soda, and salt.
In another bowl, whisk together eggs, milk, oil, and vanilla. Slowly combine the wet and dry mixtures until smooth. Gradually add the hot water and mix again. The batter will be loose, but this is what gives the cake its signature softness.
Step 3: Bake the Cake
Divide the batter evenly among the three pans and bake for 28–32 minutes. A toothpick inserted into the center should come out clean. Let the cakes cool in the pans for 10 minutes before transferring them to a wire rack.
Step 4: Prepare the Frosting
Beat the peanut butter and softened butter until fluffy and well combined (2–3 minutes). Slowly add powdered sugar, then add the cream, vanilla, and salt if using. Beat until light and smooth. If it’s too thick, add a splash more cream.
Step 5: Make the Ganache
Heat the cream just until it simmers. Pour it over the chopped chocolate in a bowl. Let it sit for a minute, then whisk in the butter until the ganache is smooth and glossy.
Step 6: Assemble the Cake
Place one cake layer on a serving plate or cake stand. Spread a thick layer of peanut butter frosting. Repeat with the remaining layers. Apply a thin crumb coat around the entire cake and chill for 20 minutes. Then apply a final coat of frosting.
Step 7: Add the Ganache & Garnish
Once the ganache is slightly cooled but still pourable, pour it onto the center of the cake and gently spread it toward the edges, letting it drip down the sides. Garnish with chopped peanuts and mini peanut butter cups if desired.
Serving Suggestions
- Slice with a hot knife for clean, neat slices.
- Serve chilled or room temperature—both are excellent.
- Pair it with coffee or cold milk to balance the richness.
This cake shines on its own but can also be served with a scoop of vanilla or peanut butter ice cream for added decadence.
Expert Tips for Success
- Don’t overbake. Moisture is key to the cake’s success.
- Use room temperature ingredients. This helps the batter emulsify properly.
- Ganache control. For a thicker ganache drip, chill it for 10 minutes before pouring.
- Cake leveler. Level the cake layers for a professional look.
- Chill before slicing. This helps set the frosting and ganache.
Variations to Try
This Peanut Butter Chocolate Layer Cake is highly versatile. Try these twists:
- Cupcakes: Use the same batter and frosting in cupcake form. Bake for 18–20 minutes.
- Salted Caramel Drizzle: Replace the ganache with a caramel sauce for a sweeter finish.
- Crunchy Texture: Fold chopped toffee or crushed pretzels into the frosting.
- Peanut Butter Swirl Cake: Marble a peanut butter mixture directly into the chocolate batter before baking.
- Gluten-Free: Use a 1:1 gluten-free flour blend.
Storage Instructions
- Room Temp: Up to 2 days in an airtight container.
- Refrigerator: 5–6 days, covered. Let come to room temperature before serving.
- Freezer: Freeze individual slices or layers tightly wrapped for up to 2 months. Thaw overnight in the fridge.
When to Serve Peanut Butter Chocolate Layer Cake
This cake is always a hit, especially at:
- Birthday parties
- Potlucks and bake sales
- Holidays like Thanksgiving and Christmas
- Casual weekends with friends
- Office parties or family gatherings
It’s visually impressive and delicious enough to compete with any bakery treat.
Final Thoughts
This Peanut Butter Chocolate Layer Cake isn’t just a recipe—it’s an experience. The combination of rich chocolate and creamy peanut butter speaks to comfort, nostalgia, and indulgence all at once. With just the right amount of effort, you’ll have a beautiful dessert that looks professionally made and tastes even better.
Peanut Butter Chocolate Layer Cake
This Peanut Butter Chocolate Layer Cake is a decadent and indulgent dessert that combines rich chocolate sponge layers with creamy, salty-sweet peanut butter frosting. Topped with ganache and crunchy peanuts, it’s the perfect cake for celebrations or when you're craving something truly special. Moist, layered, and packed with flavor—this cake is every chocolate and peanut butter lover's dream!
Ingredients
For the Chocolate Cake Layers
For the Peanut Butter Frosting
For the Chocolate Ganache
Instructions
Prepare the Cake Pans
- Preheat the oven to 175°C. Grease and line three 8-inch round cake pans with parchment paper.
Mix the Dry Ingredients
- In a large bowl, sift together the flour, cocoa powder, sugar, baking powder, baking soda, and salt. Whisk until well combined.
Add the Wet Ingredients
- Add eggs, milk, vegetable oil, and vanilla extract to the dry mixture. Mix with a hand mixer or stand mixer on medium speed until smooth (about 2 minutes).
Add Hot Water
- Slowly pour in the hot water while mixing on low speed. The batter will be thin—this is normal.
Bake the Cake
- Divide the batter evenly between the three pans. Bake for 28–32 minutes or until a toothpick inserted comes out clean. Let cakes cool in pans for 10 minutes before turning them onto wire racks to cool completely.
Make the Peanut Butter Frosting
- In a mixing bowl, beat the butter and peanut butter until smooth and fluffy (about 2–3 minutes). Gradually add powdered sugar, vanilla, and salt. Add cream one tablespoon at a time until desired consistency is reached.
Assemble the Cake
- Place one cake layer on a cake stand. Spread a generous amount of frosting over it. Repeat with the second and third layers, then frost the top and sides of the cake.
Make the Ganache
- Heat the cream in a small saucepan until just boiling. Pour it over the chopped chocolate in a bowl and let sit for 2 minutes. Add butter, then whisk until smooth.
Add the Ganache
- Let the ganache cool slightly, then pour over the top of the frosted cake, letting it drip slightly down the sides. Smooth with a spatula if needed.
Garnish and Chill
- Top with chopped peanuts and mini peanut butter cups. Chill for at least 30 minutes before slicing.
Note
For a richer cake, substitute coffee for the hot water.
Do not use natural peanut butter; it separates and affects frosting texture.
Store cake in the refrigerator for up to 5 days. Let it come to room temperature before serving.
Can be made a day ahead and chilled overnight.
You can also freeze cake layers (unfrosted) for up to 2 months. Wrap tightly.