
There is something deeply comforting about freshly baked bread. The aroma that fills the kitchen, the crackle of a golden crust, and the soft, warm interior make homemade bread feel special every single time. Yet for many home cooks, bread baking feels intimidating. Kneading, proofing, shaping, and timing can seem complicated, especially for beginners.
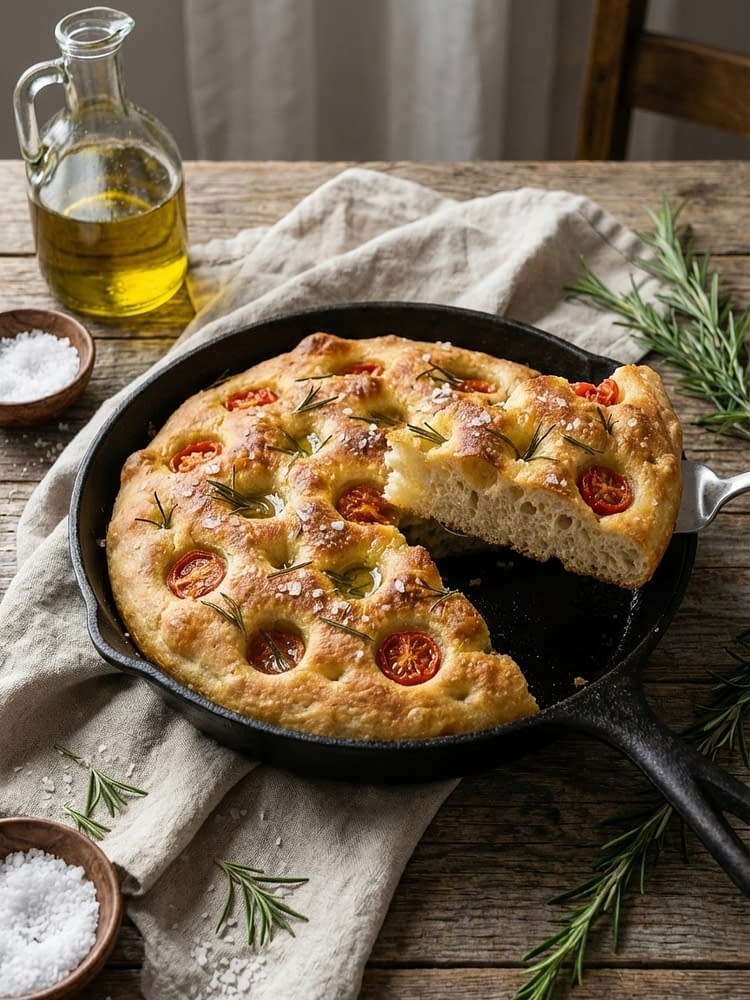
That is exactly why No-Knead Skillet Focaccia has become such a beloved recipe. It removes the most challenging part of bread-making while delivering bakery-style results. This recipe relies on time rather than effort, allowing the dough to develop structure and flavor on its own. By baking it in a skillet, you also get an incredibly crisp bottom and beautifully dimpled surface infused with olive oil.
Whether you are new to baking or simply want a reliable, low-effort bread, No-Knead Skillet Focaccia offers consistency, flexibility, and outstanding flavor. In this guide, you will learn not just how to make it, but why each step matters, how to customize it, and how to serve it in ways that elevate everyday meals.
What Makes No-Knead Skillet Focaccia Special
The Science Behind No-Knead Bread
Traditional bread relies on kneading to develop gluten, the protein network that traps gas and gives bread its structure. In no-knead recipes, gluten develops slowly over time. As the dough rests, water hydrates the flour and allows gluten strands to form naturally.
This slow fermentation creates a dough that is airy, elastic, and full of flavor without physical effort. The longer rest also allows yeast to produce organic acids, which deepen the taste and improve texture.
Why a Skillet Works So Well
Using a skillet, especially cast iron, changes how heat is distributed during baking. The skillet retains heat and delivers it evenly to the dough, helping the bottom crust brown beautifully while the inside stays soft. The oil pooled beneath the dough almost shallow-fries the base, giving No-Knead Skillet Focaccia its signature crispness.
This method also makes shaping easier. Instead of transferring fragile dough to a baking tray, you shape it directly in the skillet, reducing handling and preserving air bubbles.
Ingredients Overview and Their Roles
Flour
All-purpose flour works perfectly for No-Knead Skillet Focaccia. It provides enough protein to create structure while keeping the crumb soft. Bread flour can be used if you prefer a slightly chewier texture, but it is not required.
Yeast
Instant yeast is ideal because it can be mixed directly into dry ingredients. Active dry yeast also works, but it may need to be dissolved in warm water first. Yeast is responsible for fermentation, rise, and flavor development.
Water
Water hydrates the flour and activates the yeast. Warm water speeds up fermentation, but it should never be hot. Temperatures around 38–40°C are ideal.
Salt
Salt strengthens gluten, controls yeast activity, and enhances flavor. Skipping or reducing salt too much can lead to bland bread and poor structure.
Olive Oil
Olive oil is central to focaccia. It adds richness, prevents sticking, and creates the crisp crust. Using good-quality olive oil noticeably improves the final flavor.
Toppings
Classic focaccia toppings include rosemary and flaky salt, but this bread is incredibly versatile. Olives, tomatoes, onions, garlic, and seeds all work beautifully.
Essential Equipment for Success
You do not need specialized tools to make No-Knead Skillet Focaccia, which is part of its appeal.
A large mixing bowl allows room for fermentation.
A wooden spoon or spatula is enough for mixing.
A 10-inch oven-safe skillet, preferably cast iron, ensures even baking.
Measuring cups and spoons help maintain consistency.
A clean kitchen towel or plastic wrap keeps moisture in during resting.
Step-by-Step Guide to No-Knead Skillet Focaccia
Mixing the Dough
In a large bowl, combine flour, salt, sugar, and yeast. Stir to distribute everything evenly before adding liquids. Pour in warm water and olive oil, then mix until no dry flour remains. The dough should look rough and sticky. This is exactly how it should be.
Avoid the urge to knead. Overworking the dough at this stage defeats the purpose of the recipe.
First Rise: Letting Time Do the Work
Cover the bowl and let the dough rest at room temperature. During this time, yeast feeds on sugars in the flour, producing gas that creates air pockets. A minimum of two hours is enough, but longer fermentation improves flavor.
If your kitchen is cool, the dough may take longer to rise. If it is warm, keep an eye on it to prevent over-proofing.
Preparing the Skillet
Generously oil the skillet before adding the dough. This step ensures a crisp base and prevents sticking. Use your fingers to coat the sides as well, as focaccia often rises higher than expected.
Shaping Without Stress
Transfer the dough gently into the skillet. Use oiled fingers to stretch it outward. Do not force it. If it resists, let it rest for a few minutes and try again. This relaxation allows gluten to loosen naturally.
Creating the Signature Dimples
Press your fingertips deep into the dough, reaching almost to the bottom. These dimples are not just decorative. They hold olive oil, which flavors the bread and contributes to its texture.
Final Rest Before Baking
Allow the dough to rest once more in the skillet. This short rise ensures a lighter crumb and helps the dough fill the pan evenly.
Baking to Golden Perfection
Bake in a fully preheated oven. High heat is essential for proper rise and browning. The focaccia is done when the top is golden, the edges are crisp, and the bottom releases easily from the skillet.
Tips for Perfect Results Every Time
Hydration Matters
Sticky dough produces better focaccia. If your dough feels dry, add a tablespoon of water and mix gently.
Do Not Rush the Resting Time
Flavor develops during fermentation. If you have time, let the dough rest longer, even overnight in the refrigerator.
Use Enough Oil
Focaccia is not meant to be dry. Generous olive oil creates the characteristic texture and taste.
Check the Bottom Crust
If the top browns too quickly, place the skillet on a lower oven rack. If the bottom needs more color, place it closer to the bottom heating element during the final minutes.
Flavor Variations to Try
Classic Rosemary Focaccia
Fresh rosemary and flaky salt highlight the simplicity of the bread and let olive oil shine.
Garlic Olive Oil Focaccia
Infuse olive oil with minced garlic before drizzling it over the dough for a rich, savory flavor.
Olive and Tomato Focaccia
Add sliced olives and cherry tomatoes pressed gently into the dough for a Mediterranean-inspired variation.
Onion and Herb Focaccia
Thinly sliced onions caramelize during baking, adding sweetness and depth.
Seeded Focaccia
Sprinkle sesame, nigella, or sunflower seeds on top for extra texture.
Serving Suggestions
No-Knead Skillet Focaccia is incredibly versatile.
Serve it warm with olive oil and balsamic vinegar as an appetizer.
Use it as a base for sandwiches or panini.
Pair it with soups, stews, or salads.
Toast leftovers and serve with eggs for breakfast.
Cut into small squares for parties and gatherings.
Its neutral yet rich flavor makes it suitable for both simple meals and special occasions.
Storage and Reheating
Focaccia is best enjoyed fresh, but it stores well.
Keep it at room temperature in an airtight container for up to two days.
Refrigeration is not recommended as it dries out the bread.
Freeze slices wrapped tightly for up to one month.
Reheat in the oven at moderate temperature to restore crispness.
Common Mistakes and How to Avoid Them
Skipping enough oil can result in dry bread.
Using water that is too hot can kill the yeast.
Over-proofing causes the dough to collapse.
Under-baking leads to a gummy interior.
Understanding these pitfalls helps ensure consistent success.
Why This Recipe Works for Beginners
No-Knead Skillet Focaccia is forgiving. Measurements do not have to be exact, shaping does not require skill, and the dough tells you when it is ready. This makes it ideal for those new to bread baking while still satisfying experienced cooks.
Final Thoughts
No-Knead Skillet Focaccia proves that great bread does not require complex techniques or special equipment. With simple ingredients, patience, and a skillet, you can create a loaf that rivals bakery-quality bread.
Once you master the base recipe, the possibilities are endless. Whether you keep it classic or experiment with toppings, this bread quickly becomes a staple you will return to again and again.
No-Knead Skillet Focaccia Recipe
This No-Knead Skillet Focaccia is a soft, airy Italian-style bread with a golden, olive-oil–crisp crust, made effortlessly without kneading. Baked in a skillet for perfect texture, this beginner-friendly focaccia is ideal for dipping, sandwiches, or serving alongside soups and meals.
Ingredients
For the Focaccia Dough
For the Skillet & Topping
Instructions
Prepare the Dough
- In a large mixing bowl, combine flour, salt, sugar, and instant yeast. Stir gently to distribute evenly. Pour in the warm water and olive oil. Mix with a spoon or spatula until a sticky, shaggy dough forms. Do not knead—this rough texture is exactly what you want.
First Rest (Fermentation)
- Cover the bowl with plastic wrap or a clean kitchen towel. Let the dough rest at room temperature for at least 2 hours, or up to 12 hours for deeper flavor. The dough should double in size and develop bubbles on the surface.
Prepare the Skillet
- Pour 2 tablespoons of olive oil into a 10-inch cast-iron or oven-safe skillet. Use your fingers to spread the oil evenly across the bottom and sides to prevent sticking and enhance crust flavor.
Shape the Dough
- Transfer the risen dough directly into the oiled skillet. With oiled fingertips, gently stretch and spread the dough toward the edges. Do not force it—if it resists, let it rest for 10 minutes and continue.
Dimple & Top
- Press your fingertips deep into the dough to create classic focaccia dimples. Drizzle the remaining olive oil over the top. Sprinkle flaky salt and rosemary evenly. Add optional toppings if desired.
Final Rest
- Let the dough rest uncovered in the skillet for 20–30 minutes. This allows the dough to puff up slightly and results in a lighter crumb.
Bake the Focaccia
- Preheat the oven to 220°C. Bake the focaccia on the middle rack for 22–25 minutes, or until the top is golden brown and crisp, and the bottom sounds hollow when tapped.
Cool & Serve
- Remove from oven and let rest for 5 minutes. Lift out carefully, slice, and serve warm or at room temperature.
Note
For extra flavor, allow the dough to rest overnight in the refrigerator.
You can replace up to ½ cup of all-purpose flour with whole wheat flour.
Store leftovers in an airtight container at room temperature for up to 2 days.
Reheat in the oven at 180°C for 5–7 minutes to restore crispness.