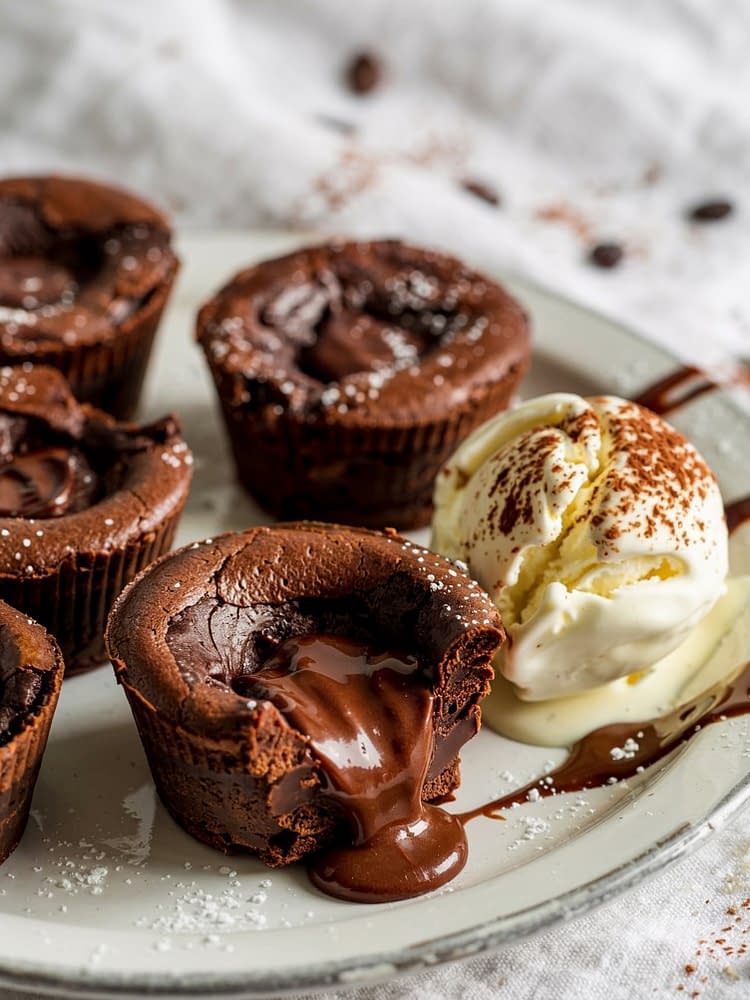

Few desserts capture indulgence quite like a warm, rich chocolate lava dessert — and these Molten Lava Brownie Cups take that experience to the next level. With their crisp, chewy brownie edges and luscious, molten centers, they’re a perfect blend of texture and flavor. Whether you’re preparing for a romantic dinner, a festive party, or simply craving something deeply chocolatey, this dessert will never disappoint.
This post will walk you through every detail — from ingredients and baking steps to expert tips and creative variations — so you can confidently recreate bakery-quality Molten Lava Brownie Cups right at home.
What Are Molten Lava Brownie Cups?
At their core, Molten Lava Brownie Cups are an elegant hybrid between a brownie and a lava cake. Each cup features a rich brownie batter baked in small molds or muffin tins, with a hidden pocket of molten chocolate in the center that melts beautifully when warm.
Unlike traditional lava cakes that rely on slightly underbaking the batter, these brownie cups achieve the molten texture through a special chocolate filling that melts perfectly inside the baked shell. This makes them easier to handle, serve, and enjoy — without losing that dramatic lava flow effect.
Why You’ll Love This Recipe
- Fudgy and Gooey: Every bite delivers deep chocolate flavor with a molten center that oozes out.
- Perfect Portions: Individual servings mean no cutting or messy plating.
- Quick to Make: Only 20 minutes of prep and under 15 minutes of baking.
- Elegant Presentation: Ideal for special occasions, parties, or cozy dessert nights.
Ingredients for Molten Lava Brownie Cups
Creating the perfect Molten Lava Brownie Cups requires simple pantry staples, but each one plays a key role in achieving the right balance of texture and flavor.
For the Brownie Batter:
- 170 g semi-sweet chocolate (chopped or use good-quality chocolate chips)
- 115 g unsalted butter (cut into cubes)
- 100 g granulated sugar
- 50 g brown sugar (adds depth and chewiness)
- 2 large eggs (room temperature)
- 1 tsp pure vanilla extract
- 65 g all-purpose flour (sifted)
- 15 g unsweetened cocoa powder (Dutch-process preferred)
- ¼ tsp salt (enhances chocolate flavor)
For the Lava Filling:
- 100 g dark chocolate (chopped into small pieces)
- 30 ml heavy cream (to form a soft, smooth center)
Optional Toppings:
- Powdered sugar (for dusting)
- Vanilla ice cream (perfect contrast to the warm brownie)
- Chocolate syrup (for extra richness)
Step-by-Step Instructions
Let’s walk through the process to ensure your Molten Lava Brownie Cups turn out flawless every single time.
Step 1: Prepare Your Bakeware
Preheat your oven to 180°C (350°F).
Lightly grease a 6-cup muffin tray or individual ramekins with butter. Dust the inside with cocoa powder instead of flour — this enhances the chocolate flavor and prevents sticking without leaving a white residue.
Pro Tip:
If you’re using silicone molds, you can skip the greasing step since they naturally release baked goods easily.
Step 2: Melt Chocolate and Butter
Place your chopped semi-sweet chocolate and butter in a heatproof bowl.
Melt using a double boiler (a bowl placed over simmering water) or microwave in 20-second intervals, stirring between each until smooth and glossy.
Allow the mixture to cool for 2–3 minutes. This prevents the eggs from curdling when added later.
Step 3: Whisk Sugars and Eggs
In a separate mixing bowl, whisk together granulated sugar, brown sugar, and eggs until the mixture becomes slightly pale and fluffy.
Add the vanilla extract and whisk again.
The combination of white and brown sugar creates a perfect balance: white sugar provides sweetness while brown sugar adds chewiness and moisture.
Step 4: Combine Wet and Dry Ingredients
Slowly pour the melted chocolate mixture into the egg mixture and whisk until fully incorporated.
Next, sift in the flour, cocoa powder, and salt. Gently fold with a spatula until no dry streaks remain. Avoid overmixing — this ensures your brownie cups stay fudgy instead of cakey.
Step 5: Prepare the Lava Filling
In a small bowl, combine chopped dark chocolate and heavy cream.
Microwave for 15–20 seconds or heat gently until melted. Stir until smooth and silky. Let it cool slightly so it thickens a bit — this will form that molten core.
Step 6: Assemble the Brownie Cups
Spoon about 1½ tablespoons of brownie batter into each muffin cup.
Add 1 teaspoon of the molten filling to the center, then top with another tablespoon of brownie batter to cover.
Make sure the filling is completely enclosed by the batter so it doesn’t leak during baking.
Step 7: Bake
Bake for 12–14 minutes at 180°C (350°F).
The edges should look firm and set, but the centers should remain slightly jiggly. Overbaking will turn your molten center into a solid brownie, so keep an eye on them.
Step 8: Cool and Serve
Allow the brownie cups to cool for 8–10 minutes before removing them from the molds.
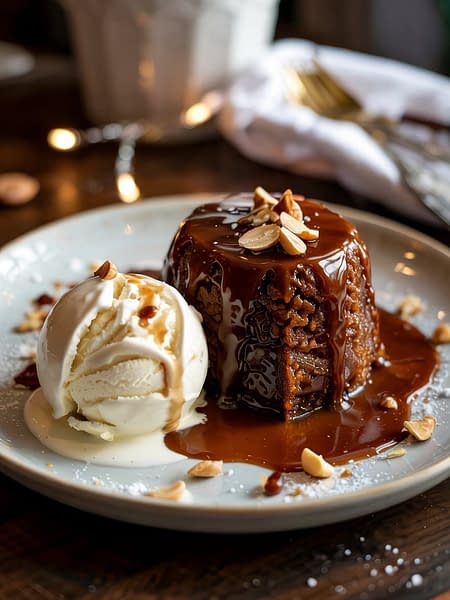
Serve warm for the best lava effect. Dust with powdered sugar, top with a scoop of vanilla ice cream, and drizzle with chocolate syrup.
Tips for Perfect Molten Lava Brownie Cups
- Use high-quality chocolate. The flavor of your dessert depends heavily on the chocolate brand — avoid compound chocolate.
- Don’t overbake. The secret to that gooey center lies in slightly underbaking. Check them at the 12-minute mark.
- Let them rest before unmolding. If removed too soon, the cups might break apart.
- Make-ahead tip: You can refrigerate the filled batter (unbaked) for up to 24 hours. Just add 1–2 extra minutes to the baking time.
- Avoid watery batter. If your batter seems too thin, chill it for 10 minutes before assembling.
Serving Suggestions
The beauty of Molten Lava Brownie Cups lies in their versatility. They can be served in several delicious ways:
- Classic Pairing: Warm with a scoop of vanilla or salted caramel ice cream.
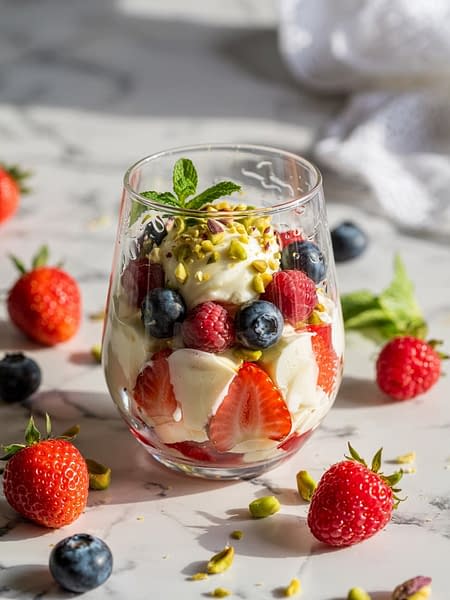
- Fruit Freshness: Pair with fresh raspberries or strawberries for a contrast of sweetness and tartness.
- Coffee Companion: Enjoy with a cup of espresso or hot chocolate for an indulgent treat.
- Dessert Platter: Present them alongside whipped cream, nuts, and chocolate shavings for parties.
Storage and Reheating
If you somehow manage to have leftovers (which is rare!), here’s how to keep them:
- At Room Temperature: Store in an airtight container for up to 2 days.
- In the Fridge: Refrigerate for 4–5 days.
- Reheat: Microwave for 15–20 seconds before serving to reactivate the molten center.
You can also freeze unbaked brownie cups for up to a month. Just bake directly from frozen, adding about 3–4 minutes to the baking time.
Variations You’ll Love
Want to give your Molten Lava Brownie Cups a twist? Try these fun variations:
- Peanut Butter Lava Cups: Replace the chocolate center with a small spoon of peanut butter mixed with a drop of honey.
- Nutella-Filled Lava Cups: Use a dollop of chilled Nutella as the center filling.
- White Chocolate Lava Cups: Swap dark chocolate for white chocolate for a sweeter, creamier contrast.
- Salted Caramel Brownie Cups: Add a small spoon of thick salted caramel in the center for a decadent twist.
- Espresso Brownie Cups: Add ½ tsp instant espresso powder to the batter to deepen the chocolate flavor.
Common Mistakes to Avoid
- Using cold ingredients: Cold eggs or butter can cause uneven mixing and affect the texture.
- Skipping cocoa dusting: Without cocoa powder on the molds, your brownie cups might stick.
- Ignoring cooling time: If removed too quickly, the molten center may spill out before serving.
- Using cheap chocolate: The quality of chocolate defines both taste and texture — invest in a premium bar.
Final Thoughts
Molten Lava Brownie Cups bring together everything dessert lovers crave — rich chocolate flavor, fudgy texture, and a molten surprise that flows with every bite. They’re indulgent yet easy to make, elegant yet comforting, and guaranteed to impress guests or satisfy your late-night sweet cravings.
Serve them with ice cream on a winter night or enjoy them with berries in summer, these molten brownie cups will become your go-to dessert for any occasion.
Once you try this recipe, you’ll see why it’s not just a dessert — it’s an experience.
Molten Lava Brownie Cups Recipe
These Molten Lava Brownie Cups are the ultimate chocolate indulgence — a rich, fudgy brownie exterior that hides a warm, gooey chocolate center. Perfectly portioned in cupcake form, they’re easy to make and serve for dinner parties, celebrations, or cozy nights in. Each cup delivers that signature “lava flow” when cut open — giving you the best of both worlds: chewy brownie edges and a molten, melt-in-your-mouth core.
Ingredients
For the Brownie Batter:
For the Filling (Lava Center):
Optional Toppings:
Instructions
Prepare Your Bakeware
- Preheat the oven to 180°C (350°F). Lightly grease a 6–cup muffin tray or ramekins with butter, then dust them lightly with cocoa powder. This prevents sticking and adds extra chocolate flavor.
Melt the Chocolate and Butter
- In a heatproof bowl, combine chopped chocolate and butter. Melt them together using a double boiler or in the microwave in short 20-second bursts, stirring between intervals until smooth and glossy. Let it cool slightly for 2–3 minutes.
Whisk the Sugars and Eggs
- In a separate bowl, whisk together granulated sugar, brown sugar, and eggs until the mixture becomes pale and slightly thick. Add vanilla extract and mix again until well combined.
Combine Wet and Dry Ingredients
- Pour the melted chocolate mixture into the sugar-egg mixture and whisk until fully blended. Sift in flour, cocoa powder, and salt, then gently fold with a spatula until just incorporated. Do not overmix — this helps keep the brownies fudgy.
Prepare the Lava Filling
- In a small bowl, melt dark chocolate and heavy cream together until smooth and silky. Set aside to cool slightly; this will become your gooey center.
Fill the Molds
- Spoon about 1½ tablespoons of brownie batter into each muffin cup.
- Add 1 teaspoon of lava filling into the center, then cover with another tablespoon of brownie batter, making sure the chocolate center is sealed inside.
Bake
- Bake for 12–14 minutes, depending on your oven. The edges should be firm, but the center should still appear slightly soft and jiggly.
Cool and Serve
- Allow the brownie cups to rest for 10 minutes before gently removing them from the pan. Serve warm, dusted with powdered sugar, and if desired, top with a scoop of vanilla ice cream or a drizzle of chocolate syrup for extra indulgence.
Note
Make-Ahead Tip: You can refrigerate the filled batter cups for up to 24 hours before baking. Just add an extra 1–2 minutes to baking time if baking straight from the fridge.
Storage: Store baked brownie cups in an airtight container at room temperature for up to 2 days or refrigerate for 4–5 days. Reheat in the microwave for 15–20 seconds before serving.
Variation: For a richer taste, add a pinch of espresso powder to enhance the chocolate flavor. You can also use milk chocolate for a sweeter lava center.
Halal Note: This recipe is 100% halal-friendly as it uses no alcohol or gelatin-based ingredients.