
Tiramisu is one of Italy’s most beloved desserts, famous for its balance of creamy mascarpone, espresso-soaked ladyfingers, and cocoa. But as much as we adore the classic version, slicing into a large tray of tiramisu can be a bit messy—especially if you’re hosting guests or want portion control. That’s where Mini Tiramisu Cups (No-Bake & Creamy) come in.
These individual servings are not only elegant and easy to present, but they’re also incredibly simple to make. No oven is required, no tricky baking techniques are involved, and you can prepare them ahead of time. Each cup showcases beautiful layers of coffee-dipped ladyfingers and velvety cream, topped with a dusting of cocoa powder that instantly makes them Instagram-worthy.
In this guide, I’ll walk you through everything you need to know—from selecting the right ingredients and assembling the perfect layers to customizing variations for kids, parties, or even health-conscious eaters. By the end, you’ll be ready to impress your family and guests with the most delightful, creamy, no-bake dessert that feels as luxurious as it tastes.
Why Choose Mini Tiramisu Cups Instead of Classic Tiramisu?
Before we dive into the recipe, let’s talk about why Mini Tiramisu Cups are such a fantastic twist:
- No-Bake Convenience: No oven, no hassle. This dessert sets beautifully in the fridge.
- Perfect Portions: Individual cups mean no messy slicing—just grab a spoon and enjoy.
- Elegant Presentation: They look stunning in glass jars, cups, or wine glasses, making them party-ready.
- Make-Ahead Friendly: These cups need chilling time, which means you can prepare them a day in advance and focus on other hosting tasks.
- Kid-Friendly Options: Swap espresso for warm milk or hot chocolate for a coffee-free version.
Ingredients for Mini Tiramisu Cups (No-Bake & Creamy)
The beauty of this dessert lies in its simplicity. Each component plays a key role in building flavor and texture.
For the Cream Filling
- Mascarpone cheese (250 g) – The heart of tiramisu, mascarpone adds creaminess and a rich, slightly tangy flavor.
- Heavy cream (1 cup, chilled) – Whipped cream lightens the mascarpone mixture and adds volume.
- Powdered sugar (0.5 cup, sifted) – For smooth sweetness without graininess.
- Vanilla extract (1 tsp) – Adds warmth and enhances the cream flavor.
For the Coffee Soak
- Espresso (1 cup, cooled) – Strong brewed coffee gives tiramisu its signature flavor.
- Sugar (1 tbsp, optional) – Balances espresso’s natural bitterness.
For the Layers
- Ladyfinger biscuits (12–14 pieces) – Crisp, sponge-like biscuits that soften when dipped in coffee.
For Garnish
- Unsweetened cocoa powder (2 tbsp) – Classic tiramisu topping that balances sweetness.
- Chocolate shavings (optional) – Adds a decorative touch.
- Fresh mint leaves (optional) – For color and freshness.
Step-by-Step Instructions
Step 1: Whip the Cream Filling
- In a chilled mixing bowl, whip heavy cream until soft peaks form.
- In another bowl, beat mascarpone, powdered sugar, and vanilla until smooth.
- Gently fold the whipped cream into the mascarpone mixture. This creates a luscious, airy cream.
Step 2: Prepare the Coffee Soak
- Brew espresso and allow it to cool completely.
- Sweeten slightly if preferred.
- Pour into a shallow dish for easy dipping.
Step 3: Layer the Ladyfingers
- Briefly dip each ladyfinger into the espresso (1–2 seconds max).
- Place a layer of dipped ladyfingers at the bottom of each serving cup.
Step 4: Add the Cream Layer
- Spoon or pipe mascarpone cream on top of the ladyfingers.
- Smooth with a spatula or spoon.
Step 5: Repeat for Full Layers
- Add another layer of coffee-dipped ladyfingers.
- Finish with a second layer of mascarpone cream.
- Smooth the top neatly.
Step 6: Garnish and Chill
- Dust with cocoa powder using a fine sieve.
- Optionally, top with chocolate shavings or a mint leaf.
- Chill for at least 2–4 hours, or overnight for best flavor.
Expert Tips for the Best Mini Tiramisu Cups
- Don’t Oversoak Ladyfingers: A quick dip is enough; otherwise, they’ll fall apart.
- Chill Time is Key: The flavors meld together beautifully after a few hours in the fridge.
- Use Cold Equipment: For whipped cream, chill your mixing bowl and whisk for the fluffiest results.
- Presentation Hack: Use piping bags to layer cream neatly for café-style perfection.
- Choose Clear Cups: Glass containers show off the layers and look more professional.
Variations of Mini Tiramisu Cups
- Kid-Friendly: Replace espresso with milk or hot chocolate.
- Flavored Cream: Add a hint of cinnamon, nutmeg, or orange zest for a twist.
- Fruit Infusion: Add a layer of sliced strawberries, raspberries, or blueberries for freshness.
- Healthier Version: Use light mascarpone or Greek yogurt, and reduce sugar.
- Party-Style: Serve in shot glasses for bite-sized dessert shooters.
Serving Suggestions
Mini Tiramisu Cups are versatile:
- At Dinner Parties: Serve in elegant wine glasses with dessert spoons.
- For Birthdays: Top with sprinkles or edible glitter.
- During Holidays: Add crushed peppermint or cinnamon dust.
- At Weddings or Showers: Present them on tiered dessert trays for a chic display.
Storage and Make-Ahead Tips
- Store covered in the refrigerator for up to 3 days.
- Do not freeze—the mascarpone mixture may separate.
- Prepare the night before for deeper, richer flavors.
Why This Recipe Works for Any Occasion
From casual family dinners to fancy gatherings, Mini Tiramisu Cups (No-Bake & Creamy) strike the perfect balance of elegance and convenience. The fact that you can prepare them ahead of time, customize flavors, and present them beautifully makes this recipe a must-have in your dessert collection.
Final Thoughts
If you love tiramisu but want a cleaner, easier way to serve it, these Mini Tiramisu Cups are the answer. They’re creamy, light, and absolutely indulgent while being effortless to put together. This no-bake dessert will always impress. So whip up that cream, and layer your way to dessert perfection. Your guests (and your taste buds) will thank you.
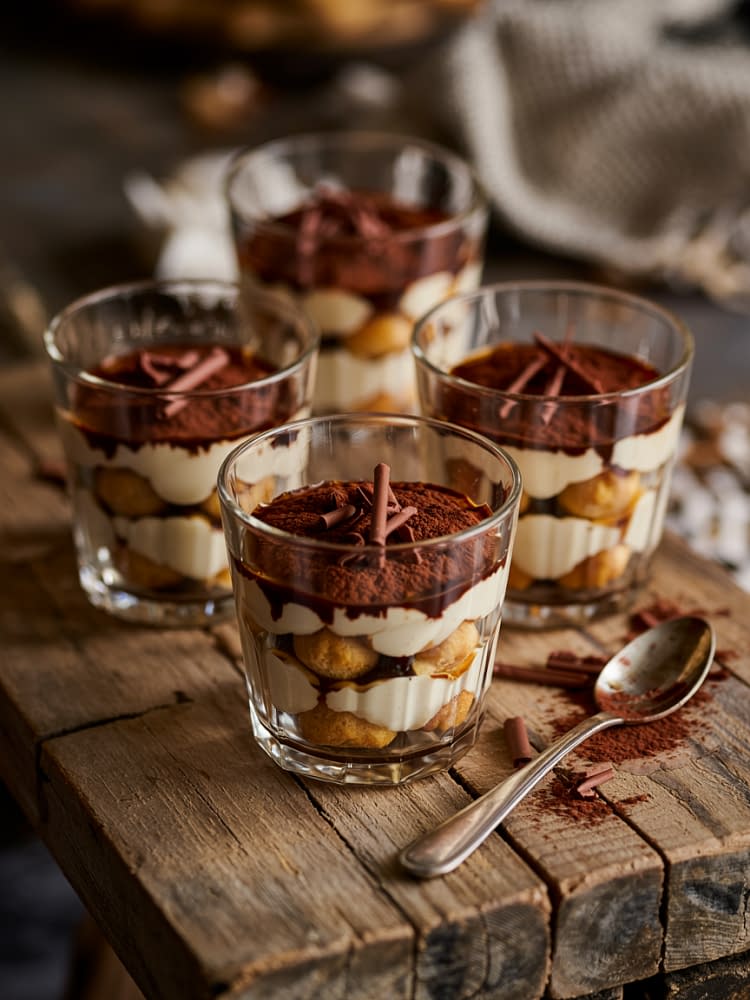
Mini Tiramisu Cups (No-Bake & Creamy)
These Mini Tiramisu Cups are a delightful, no-bake twist on the classic Italian dessert. Made with layers of espresso-soaked ladyfingers, creamy mascarpone filling, and a dusting of cocoa, these individual cups are elegant, easy to prepare, and perfect for parties or special occasions. They’re light, creamy, and portion-controlled—making them a convenient way to enjoy tiramisu without the hassle of slicing.
Ingredients
For the Cream Filling
For the Coffee Soak
For the Layers
For Garnish
Instructions
Prepare the Cream Filling
- Whip the chilled heavy cream in a clean bowl until soft peaks form. In another bowl, beat mascarpone, powdered sugar, and vanilla until smooth and creamy. Gently fold the whipped cream into the mascarpone mixture until fully combined and fluffy.
Make the Coffee Soak
- Brew strong espresso (or concentrated coffee) and allow it to cool completely. Stir in sugar if desired. Pour into a shallow dish.
Assemble the First Layer
- Dip each ladyfinger briefly (1–2 seconds) into the cooled coffee—do not soak too long or they will become soggy. Place a layer of dipped ladyfinger pieces at the bottom of each serving cup.
Add Cream Layer
- Spoon or pipe a generous layer of mascarpone cream mixture over the ladyfingers, spreading evenly.
Repeat the Layers
- Add another layer of dipped ladyfingers, followed by another layer of cream. Smooth the top with a spatula for a neat finish.
Garnish and Chill
- Dust the top with unsweetened cocoa powder using a fine sieve. Add chocolate shavings or a small mint leaf if desired. Cover the cups and refrigerate for 2–4 hours (or overnight) to allow flavors to set.
Note
Storage: Store tiramisu cups covered in the refrigerator for up to 3 days. Do not freeze, as the cream may separate.
Make-Ahead: Best prepared a day in advance for enhanced flavor.
Coffee-Free Variation: For a kid-friendly version, dip biscuits in warm milk or hot chocolate instead of coffee.
Flavored Variations: Add a pinch of cinnamon or cardamom to the cream for a unique twist.
Texture Tip: Do not over-soak the ladyfingers, or the layers will collapse.