
When you think of an easy, comforting meal that delivers big on flavor, Cheesy Garlic Chicken Wraps should come to mind. These wraps are the kind of dish that feels indulgent, tastes gourmet, and yet comes together with simple ingredients and minimal effort.
Whether you’re looking for a reliable lunch option, a quick dinner, or something delicious to meal prep for the week, this recipe brings together everything you want in one tightly wrapped, crispy package: bold garlic, rich melted cheese, juicy chicken, and the freshness of veggies.
In this guide, you’ll learn exactly how to make Cheesy Garlic Chicken Wraps from scratch, including ingredient breakdowns, preparation steps, expert tips, flavor variations, and serving ideas. Let’s dig into the details.
Why Cheesy Garlic Chicken Wraps Work So Well
Cheesy Garlic Chicken Wraps are popular for several good reasons:
- Bold flavor combination: Garlic and cheese are a match made in heaven, especially when paired with tender chicken.
- Satisfying texture: A crispy toasted tortilla gives way to gooey cheese and moist chicken.
- Easy to make: It’s a straightforward process that even beginner home cooks can manage.
- Adaptable: You can add or swap ingredients to match your preferences, dietary needs, or what’s in your fridge.
What Are Cheesy Garlic Chicken Wraps?
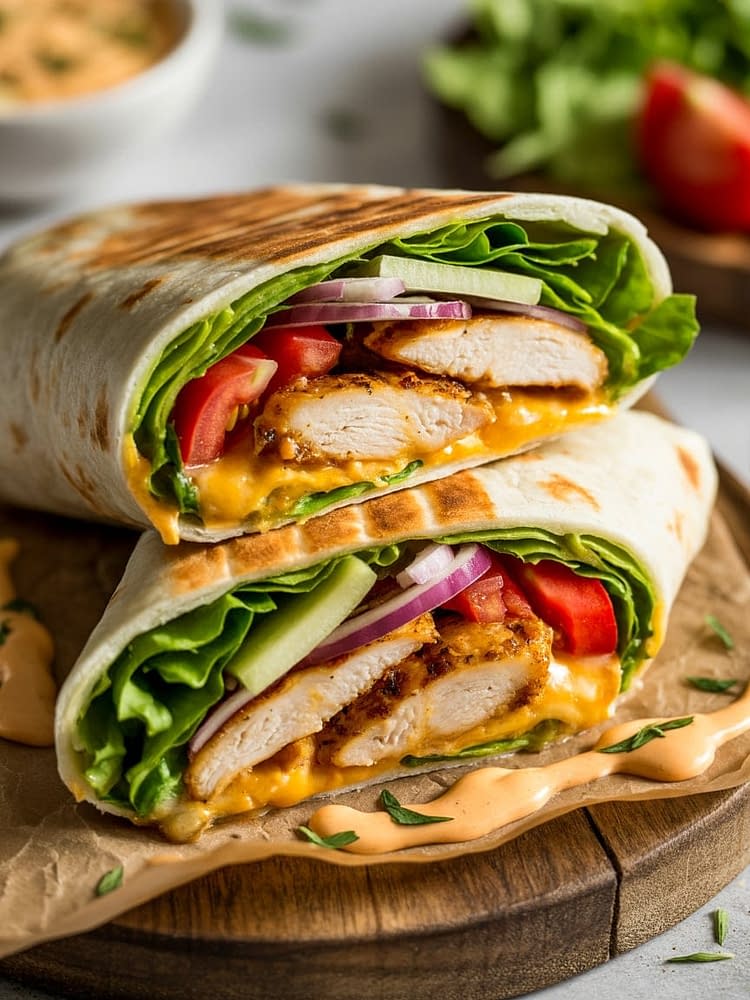
Cheesy Garlic Chicken Wraps are soft flour tortillas filled with garlic-seasoned chicken, a homemade cheese sauce, shredded mozzarella, and fresh toppings like lettuce, tomato, and red onion. The wraps are grilled or toasted until golden and crispy, making every bite warm, melty, and satisfying.
They’re similar to quesadillas or panini-style sandwiches but stand out because of the garlic butter coating and the rich, flavorful filling.
Ingredients in Detail
Understanding the role of each ingredient helps you customize or perfect the recipe.
For the Garlic Chicken
- Chicken breast (about 500g) – Lean, tender, and quick to cook. Chicken thighs can also be used for a juicier result.
- Olive oil – Prevents the butter from burning and adds richness.
- Unsalted butter – Infuses the chicken with creamy flavor and works as the base for the garlic.
- Garlic (3–4 cloves, minced) – Fresh garlic is essential for deep flavor.
- Paprika – Adds warmth and subtle smokiness.
- Oregano – Balances the richness with a hint of herbaceous flavor.
- Salt and black pepper – Essential for proper seasoning.
For the Cheese Sauce
- Unsalted butter (2 tablespoons)
- All-purpose flour (2 tablespoons) – Creates a roux to thicken the sauce.
- Milk (1.5 cups, warmed) – Helps form a smooth, creamy consistency.
- Cheddar cheese (1.5 cups, shredded) – Melts beautifully into the sauce, adding sharpness and depth.
- Garlic powder (½ teaspoon) – Reinforces the garlic theme.
- Salt (to taste) – Brings out the flavor in the sauce.
For Assembly
- Large flour tortillas (4–6) – Choose soft, pliable wraps to hold the filling securely.
- Shredded mozzarella (1 cup) – Provides the stretchy cheese factor.
- Lettuce, tomato, red onion (optional but recommended) – Adds freshness and crunch.
- Optional sauces – Garlic aioli, hot sauce, or ranch dressing can be added for extra flavor.
Step-by-Step Instructions
Step 1: Prepare the Garlic Chicken
- In a large skillet, heat the olive oil and butter over medium heat.
- Add the minced garlic and sauté for 30 seconds, just until fragrant.
- Add the chicken strips to the pan. Sprinkle with paprika, oregano, salt, and pepper.
- Cook for 6 to 8 minutes, turning occasionally, until the chicken is fully cooked and lightly golden.
- Remove the chicken from the skillet and set it aside.
Tip: Avoid overcrowding the pan. Cook in batches if needed to ensure a proper sear.
Step 2: Make the Cheese Sauc
- In a separate saucepan, melt the butter over medium heat.
- Whisk in the flour and cook for 1 to 2 minutes to eliminate the raw taste.
- Gradually pour in the warm milk, whisking continuously to avoid lumps.
- Once the sauce thickens, reduce the heat and stir in the shredded cheddar cheese and garlic powder.
- Season with salt and stir until smooth. Remove from heat.
Tip: Use freshly shredded cheese instead of pre-shredded varieties, which often contain anti-caking agents that prevent smooth melting.
Step 3: Warm the Tortillas
Briefly heat each tortilla in a skillet or microwave until warm and pliable. This helps prevent cracking or tearing during folding.
Step 4: Assemble the Wraps
- Lay each tortilla flat on a clean surface.
- Start with a handful of lettuce and sliced tomato in the center.
- Add a generous spoonful of garlic chicken.
- Drizzle with warm cheese sauce and sprinkle with shredded mozzarella.
- Add any additional sauces or toppings.
Tip: Don’t overstuff. It makes folding difficult and can lead to the wrap bursting open during grilling.
Step 5: Fold and Grill
- Fold the sides of the tortilla over the filling, then roll tightly into a wrap.
- Place the wrap seam-side down in a preheated skillet or grill pan.
- Press gently and grill for 1 to 2 minutes on each side, or until golden and crispy.
Tip: For extra crispness, brush the outside of the wrap with a bit of oil or butter before grilling.
Serving Suggestions
Cheesy Garlic Chicken Wraps can be served on their own or with a variety of sides for a more complete meal.
Recommended pairings:
- Sweet potato fries or classic fries
- Simple green salad with vinaigrette
- Pickles or pickled vegetables
- Coleslaw or a fresh cabbage slaw
- Roasted or steamed broccoli
If you’re making these for a group or party, slice them in halves or thirds for easy serving and dipping.
Variations to Try
These wraps are incredibly versatile, and you can easily adjust them based on dietary needs or flavor preferences.
Spicy Chicken Wrap
Add hot sauce or cayenne to the garlic butter for a fiery twist.
BBQ Garlic Chicken Wrap
Substitute the garlic cheese sauce with smoky BBQ sauce, or combine both for a sweet-and-savory contrast.
Vegetarian Garlic Wrap
Use grilled mushrooms or chickpeas in place of chicken. Add sautéed spinach or zucchini for more texture.
Mediterranean Wrap
Include sliced olives, feta cheese, and cucumber along with garlic chicken and skip the cheddar sauce.
Low-Carb Option
Use low-carb tortillas or serve the filling as a lettuce wrap for a lighter version.
Make-Ahead and Storage Tips
Refrigeration:
Assembled wraps (before grilling) can be stored in the refrigerator for up to 2 days. Wrap them tightly in foil or plastic wrap.
Freezing:
Freeze ungrilled wraps (without raw vegetables) for up to 2 months. Thaw overnight in the fridge before grilling.
Reheating:
Reheat wraps in a skillet or air fryer to preserve crispness. Avoid the microwave for best texture.
Meal Prep Tip:
Store each component separately—chicken, cheese sauce, and vegetables—then assemble fresh for lunch or dinner throughout the week.
Tips for Success
- Use high-quality tortillas. Thin, brittle ones tend to tear.
- Don’t skip the garlic—both fresh and powdered add layers of flavor.
- Rest the grilled wrap for a couple of minutes before slicing to avoid the filling spilling out.
- Make a double batch of cheese sauce—it goes great on pasta, nachos, or roasted vegetables too.
Final Thoughts
Cheesy Garlic Chicken Wraps are more than just a quick meal—they’re a comforting, flavor-packed solution to busy nights, picky eaters, or meal prep struggles. Their rich garlic aroma, melty cheese texture, and endless customization options make them a staple in any home cook’s rotation.
If you’ve never made your own wraps at home, this recipe is a great place to start. It’s approachable, satisfying, and delivers restaurant-quality results with ingredients you already have in your kitchen.
Cheesy Garlic Chicken Wraps
These Cheesy Garlic Chicken Wraps are packed with juicy grilled chicken, rich garlic butter, melty cheese, and fresh veggies, all wrapped in a warm tortilla. Perfect for a quick lunch, dinner, or meal prep, this wrap delivers a satisfying bite full of bold flavor and creamy texture. Quick, easy, and delicious for any time of year!
Ingredients
For the Garlic Butter Chicken
For the Cheese Sauce
For the Wrap Assembly
Instructions
Prepare the Garlic Butter Chicken
- In a skillet over medium heat, add olive oil and butter. Once melted, add garlic and sauté for 30 seconds. Add chicken strips, smoked paprika, oregano, salt, and pepper. Cook for 6-8 minutes until chicken is golden and cooked through. Set aside.
Make the Cheese Sauce
- In a small saucepan, melt butter over medium heat. Whisk in the flour and cook for 1 minute. Gradually add warm milk, whisking continuously until smooth. Stir in cheddar cheese, garlic powder, and a pinch of salt. Cook until the sauce thickens. Remove from heat.
Warm the Tortillas
- Lightly warm the tortillas in a dry skillet or microwave for 20 seconds until pliable.
Assemble the Wraps
- Place a warm tortilla on a flat surface. Add lettuce, tomato slices, and red onions as the base. Spoon over the garlic chicken, drizzle with cheese sauce, sprinkle mozzarella cheese, and add optional sauce if desired.
Grill the Wraps (Optional but Recommended)
- Fold the wrap tightly. Place seam-side down on a preheated grill pan or skillet. Grill each side for 1-2 minutes until the wrap is crispy and cheese inside melts.
Rest and Serve
- Let the wrap sit for 2–3 minutes before slicing in half. Serve hot with a side of fries, salad, or dipping sauce.
Note
- Make Ahead Tip: Chicken and cheese sauce can be prepped up to 2 days ahead and stored in the fridge.
- Storage: Store assembled wraps (ungrilled) in foil or wrap tightly and refrigerate up to 2 days. Reheat on skillet or microwave.
- Variations:
- Use whole wheat or spinach tortillas for a healthier twist.
- Add avocado slices or grilled bell peppers for extra flavor.
- Substitute with rotisserie chicken to save time.