
When the holidays roll in, people look for food that feels like celebration and comfort at the same time. The Candy Cane Pizza Breadsticks Recipe brings both: it takes the familiar flavors of pizza — soft, yeasted dough, melted mozzarella, and bright tomato sauce — and turns them into a playful, holiday-ready finger food. Shaped like tiny candy canes and brushed with garlicky butter, these breadsticks are as fun to serve as they are to eat. Whether you want an appetizer for a Christmas gathering, a kid-friendly party treat, or a creative snack for winter game nights, this recipe delivers.
This long-form post will walk you through every step of the Candy Cane Pizza Breadsticks Recipe, including the ingredients, detailed instructions, professional tips for consistent results, variations to suit different diets, serving ideas, make-ahead options, storage advice, and frequently asked questions. My goal is to give you enough detail to make this recipe confidently, even if you’re a complete beginner at working with yeast.
Why this recipe works
Candy Cane Pizza Breadsticks hit the sweet spot between novelty and simplicity. The recipe uses basic pizza ingredients and simple shaping to create an eye-catching result. Key reasons this works well:
- The dough is soft and forgiving, making shaping easy even if you don’t have advanced bread skills.
- A thin layer of sauce and a moderate amount of cheese keep the breadsticks from getting soggy during shaping and baking.
- Baking at a moderately high temperature produces a golden-crisp exterior with a soft interior.
- Brushing with garlic butter after baking adds aroma and keeps the finished breadsticks shiny and flavorful.
Now let’s move into the practical details so you can create these at home.
Ingredient list (copy-friendly)
For ease of copying, here are the ingredients written as plain text lines you can paste or print.
For the dough
- 2½ cups all-purpose flour (sifted)
- 1 teaspoon fine salt
- 1 teaspoon sugar
- 2 teaspoons instant dry yeast
- ¾ cup warm water (about 38–43°C)
- 2 tablespoons olive oil
For the filling
- 1 cup shredded mozzarella cheese
- ½ cup turkey or beef pepperoni, finely chopped (optional)
- 3 tablespoons pizza sauce or thick tomato passata
- 1 teaspoon dried oregano
- ½ teaspoon garlic powder
- ¼ teaspoon chili flakes (optional)
For brushing and finishing
- 2 tablespoons unsalted butter, melted
- 1 teaspoon garlic paste or 1 clove garlic, finely grated
- 1 tablespoon finely chopped fresh parsley (or 1 teaspoon dried parsley)
- Extra flour for dusting
Notes: All ingredients listed are. If you use pepperoni or any processed meat, ensure it is certified.
Equipment you’ll need
- Large mixing bowl
- Measuring cups and spoons
- Kitchen scale (optional, but helpful for accuracy)
- Rolling pin
- Sharp knife or pizza cutter
- Rimmed baking sheet
- Parchment paper or a silicone baking mat
- Pastry brush
- Clean kitchen towel or plastic wrap
- Cooling rack
Detailed step-by-step instructions
Make the dough
- Combine the dry ingredients
In a large mixing bowl, whisk together 2½ cups of all-purpose flour, 1 teaspoon salt, 1 teaspoon sugar, and 2 teaspoons instant dry yeast. Using instant yeast skips the need to proof it first, but if you prefer proofing, dissolve the yeast in the warm water with sugar and wait 5–10 minutes until bubbly. - Add the wet ingredients
Make a small well in the dry mix and pour in ¾ cup warm water and 2 tablespoons olive oil. Use a wooden spoon or your hand to gradually bring the dough together. - Knead the dough
Turn the dough onto a lightly floured surface and knead for about 8–10 minutes until the dough is smooth, elastic, and slightly tacky. If the dough feels too sticky, add a tablespoon of flour at a time; if it’s too dry, add a teaspoon of water at a time. - First rest
Lightly oil a clean bowl and place the dough inside, turning it once to coat. Cover with a clean towel or plastic wrap and let it rest for 10 minutes to relax the gluten — this short rest also makes rolling and shaping easier.
Prepare the filling and preheat the oven
- Mix the filling
In a small bowl combine 1 cup shredded mozzarella, ½ cup finely chopped pepperoni (optional), 1 teaspoon dried oregano, ½ teaspoon garlic powder, and ¼ teaspoon chili flakes if using. Keep this mixture nearby so you can assemble quickly. - Preheat the oven
Preheat your oven to 200°C (about 400°F). Line a baking tray with parchment paper or a silicone mat.
Roll, fill, and shape
- Roll out the dough
On a lightly floured surface, roll the dough into a rectangle roughly 30 x 25 cm and about 4–6 mm thick. Try to keep the thickness consistent so the breadsticks bake evenly. - Add the sauce
Spread about 3 tablespoons of pizza sauce in a thin, even layer over the dough, leaving a 1 cm border on the long edges to avoid sauce spilling out during shaping. - Sprinkle the filling
Evenly distribute the cheese and pepperoni mixture across the sauced dough. Be careful not to overfill — too much filling makes shaping difficult and risks leakage in the oven. - Slice into strips
Use a sharp knife or pizza cutter to slice the dough into strips approximately 2 cm wide. Work steadily so the strips are even. - Twist and shape into candy canes
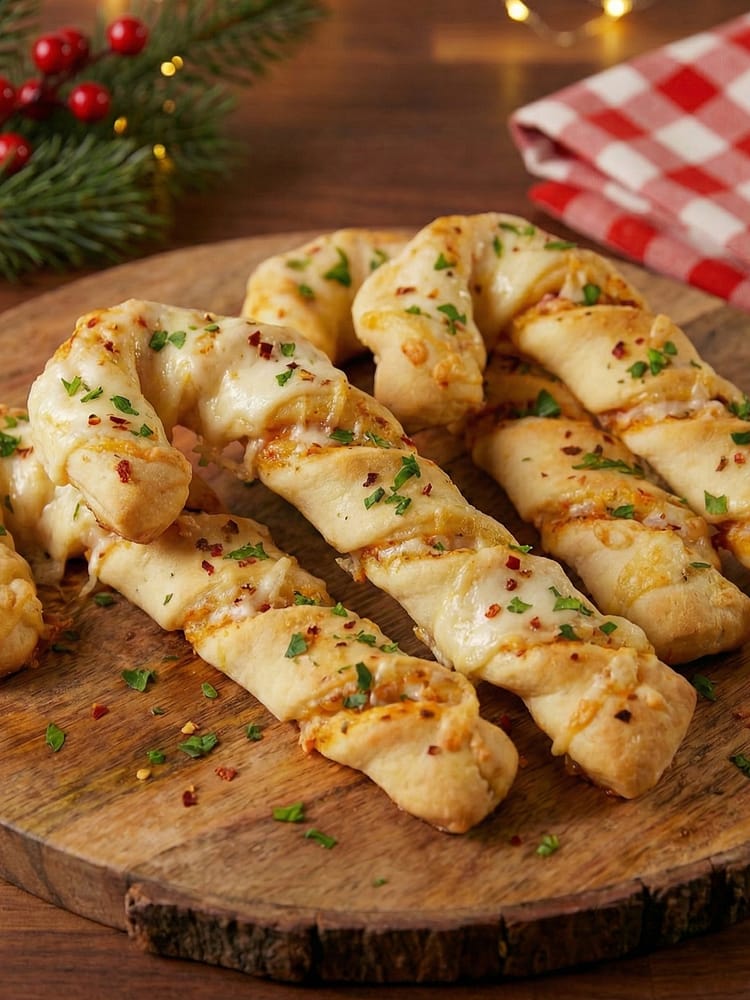
Take each strip and gently twist it a few times to create a spiral look. Curve one end of the twisted strip into a hook so it resembles a candy cane. Place shaped breadsticks on the prepared tray, spacing them about 2–3 cm apart to allow for slight expansion.
Brush, bake, and finish
- Pre-bake brush
Combine 2 tablespoons melted butter with 1 teaspoon garlic paste (or grated garlic) and reserve about half for after baking. Lightly brush the shaped breadsticks with a thin layer of the garlic butter. - Bake
Bake in the preheated 200°C oven for 13–15 minutes, rotating the tray halfway through if your oven heats unevenly. Look for a golden-brown exterior and bubbling cheese in the spirals. - Final brush and garnish
Remove the tray from the oven and immediately brush the breadsticks with the remaining garlic butter. Sprinkle with 1 tablespoon chopped fresh parsley for color and freshness. - Cool and serve
Let the breadsticks cool on a rack for 3–5 minutes to set slightly before serving. Warm is best for that melty-cheese texture.
Tips for success
Dough handling tips
- Warm liquid: The water should be warm but not hot. Aim for roughly 38–43°C to activate the yeast without killing it.
- Measuring: If you bake often, use a kitchen scale for better consistency. 2½ cups of all-purpose flour is roughly 320 grams, but different flours pack differently in cups.
- Kneading test: The dough should pass the “windowpane” test for elasticity: stretch a small piece — it should thin out without tearing immediately. This isn’t mandatory for success, but it helps produce a good crumb.
Shaping and filling tips
- Thin sauce layer: Too much sauce can make the dough soggy and hard to shape. A thin even spread is enough to give flavor.
- Avoid overfilling: Too much cheese or meat will leak during baking. Keep filling moderate.
- Even strips: Try to cut uniform-width strips so they all bake at the same rate.
Baking tips
- Hot oven: A steady 200°C produces a golden outside and soft inside. If you want a crispier exterior, increase to 210°C for the last 2 minutes but watch closely.
- Rotate halfway: If you know your oven has hot spots, rotate the tray after 7–8 minutes.
Variations to try
Vegetarian option
Skip pepperoni and use roasted red pepper strips, sautéed mushrooms, or caramelized onions. You can also sprinkle with crumbled feta for tang.
Cheese-forward version
Use a blend of mozzarella and provolone or add a little grated parmesan on top before baking for a nuttier finish.
Herb & garlic breadsticks (no sauce)
Skip the tomato sauce and fill with olive oil, minced garlic, and herbs. Think of these as garlic bread in a candy cane shape.
Spicy version
Mix diced jalapeños or crushed red pepper into the filling and use pepper jack cheese for a smoky, spicy edge.
Gluten-free approach
Use a high-quality gluten-free pizza dough mix that is designed to be rolled and shaped. Many gluten-free doughs handle best when chilled first and worked gently.
Serving suggestions and pairings
Candy Cane Pizza Breadsticks are versatile for parties and casual meals. Here are serving ideas:
- Holiday appetizer platter: Place breadsticks alongside small bowls of marinara, garlic butter, and pesto for dipping. Add olives, cherry tomatoes, and sliced cheeses around the tray for variety.
- Kid-friendly snack box: Serve with carrot and cucumber sticks and a cup of yogurt-based dip.
- Game night: Pair with a light salad and hot wings for a casual spread.
- Party finger food: Arrange on a festive board with crackers and cold cuts for grazing guests.
Make-ahead, freezing, and storage
Make-ahead
- Prepare the dough the day before: After kneading, place it in the refrigerator in an oiled, covered bowl. A slow overnight rise develops flavor. Bring the dough to room temperature before rolling and shaping.
- Assemble up to shaping stage and refrigerate: Shape the breadsticks, place on a tray, cover tightly, and refrigerate for up to 24 hours. Brush and bake when ready.
Freezing
- Freeze unbaked shaped breadsticks on a tray until solid, then transfer to a zip-top bag and store up to 1 month. Bake from frozen, adding a few extra minutes to the baking time and covering lightly with foil for the first part of baking if needed.
- To freeze baked breadsticks, cool completely, then wrap tightly and freeze up to 2 months. Reheat in a 180°C oven for 8–10 minutes.
Storage
- Room temperature: Store leftovers in an airtight container for up to 2 days.
- Refrigeration: Keep for up to 4 days. Reheat in the oven to restore crispness.
Troubleshooting common issues
Dough too sticky
Add flour one tablespoon at a time and knead until tacky but not wet. Avoid adding too much or the dough will be dry and dense.
Dough too tough
If the dough is tough and tight, it likely needs more resting time. Let it rest covered for 10–15 minutes before rolling.
Breadsticks not browning
Increase oven temperature by 10–15°C during the last few minutes or move the tray to a higher rack for the final 2–3 minutes. Watch carefully to avoid burning.
Nutrition notes (approximate)
Nutrition will vary by portion size and exact ingredients. These breadsticks are essentially enriched dough with cheese and a light amount of fat from butter and oil. To reduce calories, use less cheese, leaner meat options, or smaller portion sizes.
Final thoughts
The Candy Cane Pizza Breadsticks Recipe is an ideal holiday project that balances novelty, flavor, and approachability. It’s forgiving enough for novice bakers and flexible enough for more experienced cooks to tweak and personalize. The visual impact of candy cane–shaped breadsticks makes them especially appealing for Christmas parties, school events, and family gatherings. With the detailed steps and tips in this post, you should feel confident making them from scratch — and proud of the festive results.
Candy Cane Pizza Breadsticks Recipe – Easy & Festive Holiday Appetizer
These Candy Cane Pizza Breadsticks are a fun, festive twist on classic pizza dough, shaped like candy canes and baked until golden and cheesy. Perfect for Christmas parties, holiday snacks, or kid-friendly gatherings, this easy baked recipe combines soft breadsticks, melty mozzarella, and savory pizza flavors in a visually playful way that everyone loves.
Ingredients
For the Dough
For the Pizza Filling
For Brushing
Instructions
Prepare the Dough
-
In a large mixing bowl, combine flour, salt, sugar, and instant yeast. Add warm water and olive oil. Mix until a soft dough forms. Transfer to a lightly floured surface and knead for 8–10 minutes until smooth and elastic.
Rest the Dough
-
Place the dough in a lightly oiled bowl, cover with a clean kitchen towel, and let it rest for 10 minutes. This helps relax the gluten and makes shaping easier.
Preheat the Oven
-
Preheat your oven to 200°C. Line a baking tray with parchment paper and set aside.
Roll and Fill
-
Roll the rested dough into a rectangle about ½ cm thick. Spread a thin layer of pizza sauce evenly over the surface. Sprinkle mozzarella cheese, halal pepperoni (if using), oregano, garlic powder, and chili flakes.
Cut and Shape
-
Using a sharp knife or pizza cutter, slice the dough into long strips (about 2 cm wide). Gently twist each strip and curve one end to form a candy cane shape.
Arrange and Brush
-
Place the shaped breadsticks onto the prepared baking tray, leaving space between each. Mix melted butter with garlic paste and brush generously over the breadsticks.
Bake
-
Bake in the preheated oven for 13–15 minutes, or until golden brown and the cheese is melted and bubbling.
Final Touch
-
Once baked, brush again lightly with garlic butter and sprinkle with parsley. Serve warm.
Note
You can make this recipe vegetarian by skipping the pepperoni and adding olives, bell peppers, or mushrooms.
These breadsticks taste best when served fresh but can be stored in an airtight container for up to 2 days.
Reheat in the oven at 180°C for 5 minutes to restore crispness.
For extra color, you can brush half the breadsticks with plain butter and sprinkle paprika lightly for a red-white festive look.


