
Welcome to our kitchen! Today, we’re diving into the art of baking the perfect biscuits using a Dutch oven. Whether you’re an outdoor enthusiast, a camping aficionado, or simply love the versatility of Dutch ovens in your kitchen, this recipe is tailored for you. Let’s embark on a journey to create light, flaky, and buttery biscuits that rival those from your favorite bakery.
Why Use a Dutch Oven for Biscuits?
Dutch ovens are renowned for their ability to distribute heat evenly, making them ideal for baking a variety of dishes, including biscuits. Whether you’re baking indoors or outdoors over an open flame, a Dutch oven ensures that your biscuits rise uniformly with a golden-brown crust and a tender crumb. Additionally, the heavy lid of a Dutch oven traps steam, which helps in achieving that perfect flakiness in your biscuits.
Ingredients You’ll Need
Gather the following ingredients to make approximately 12 medium-sized biscuits:
- 2 cups (240g) all-purpose flour
- 1 tablespoon baking powder
- 1 teaspoon salt
- 1/2 cup (113g) unsalted butter, cold and cubed
- 3/4 cup (180ml) whole milk or buttermilk
- Optional: 1 tablespoon sugar (for a slightly sweet biscuit)
- Optional: 1 teaspoon garlic powder or herbs for savory variations
Essential Equipment
Before we start baking, ensure you have the following equipment ready:
- Dutch Oven: Preferably 5-7 quart capacity for even baking.
- Rolling Pin or Biscuit Cutter: For shaping the biscuits.
- Mixing Bowls: For combining ingredients.
- Measuring Cups and Spoons: For accurate measurements.
- Pastry Blender or Fork: To cut the butter into the flour.
- Parchment Paper or Non-Stick Spray: To prevent sticking.
- Cooling Rack: For cooling the biscuits post-baking.
Step-by-Step Instructions
1. Preheat Your Dutch Oven
- Indoor Baking: Place your Dutch oven in the oven and preheat to 425°F (220°C) for about 15-20 minutes.
- Outdoor Baking: If using over a campfire or grill, allow the Dutch oven to heat up evenly over medium-high heat.
2. Prepare the Dry Ingredients
In a large mixing bowl, whisk together:


- 2 cups all-purpose flour
- 1 tablespoon baking powder
- 1 teaspoon salt
- (Optional) 1 tablespoon sugar
- (Optional) 1 teaspoon garlic powder or your choice of herbs
3. Incorporate the Butter
Add the cold, cubed unsalted butter to the dry ingredients. Using a pastry blender, fork, or your fingertips, cut the butter into the flour mixture until it resembles coarse crumbs with pea-sized pieces remaining.
4. Add the Milk
Pour in 3/4 cup of whole milk or buttermilk. Gently stir the mixture until the dough begins to come together. Avoid overmixing to ensure tender biscuits.
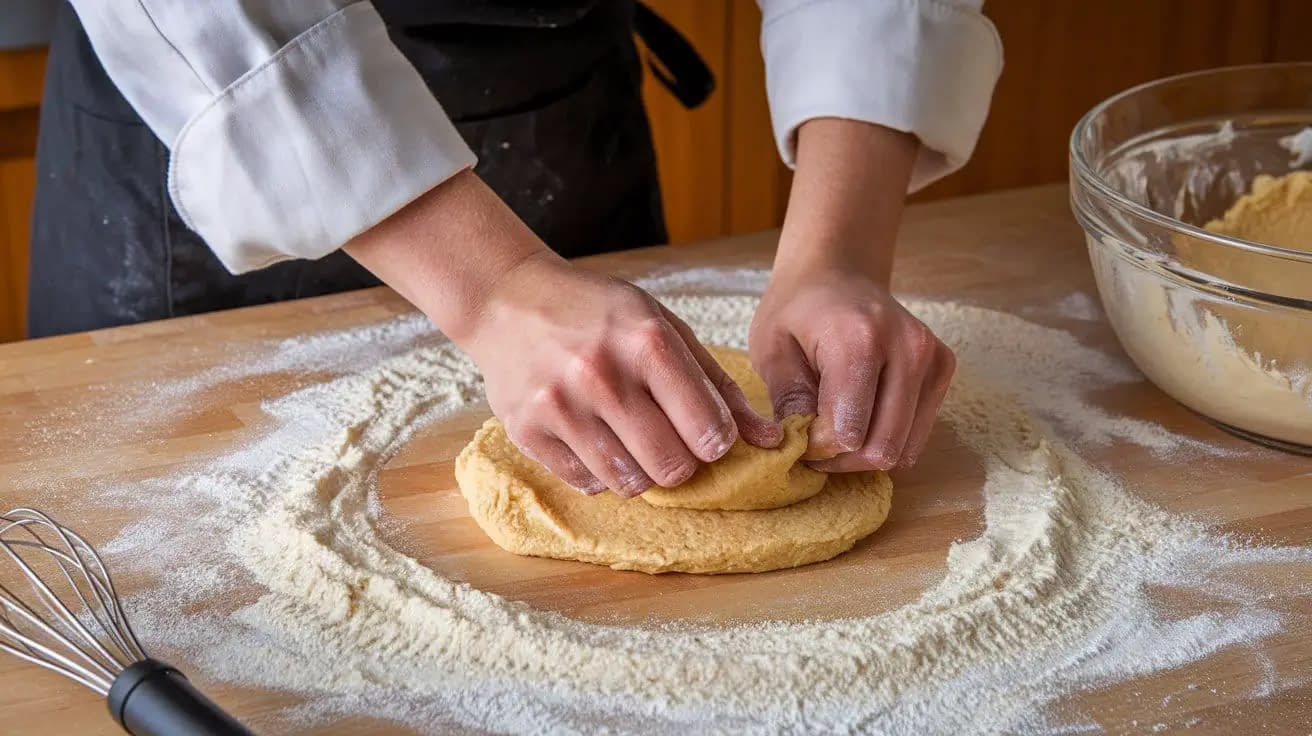
5. Knead the Dough
Turn the dough onto a lightly floured surface. Gently knead it 5-6 times, just until it holds together. Over-kneading can make the biscuits tough.
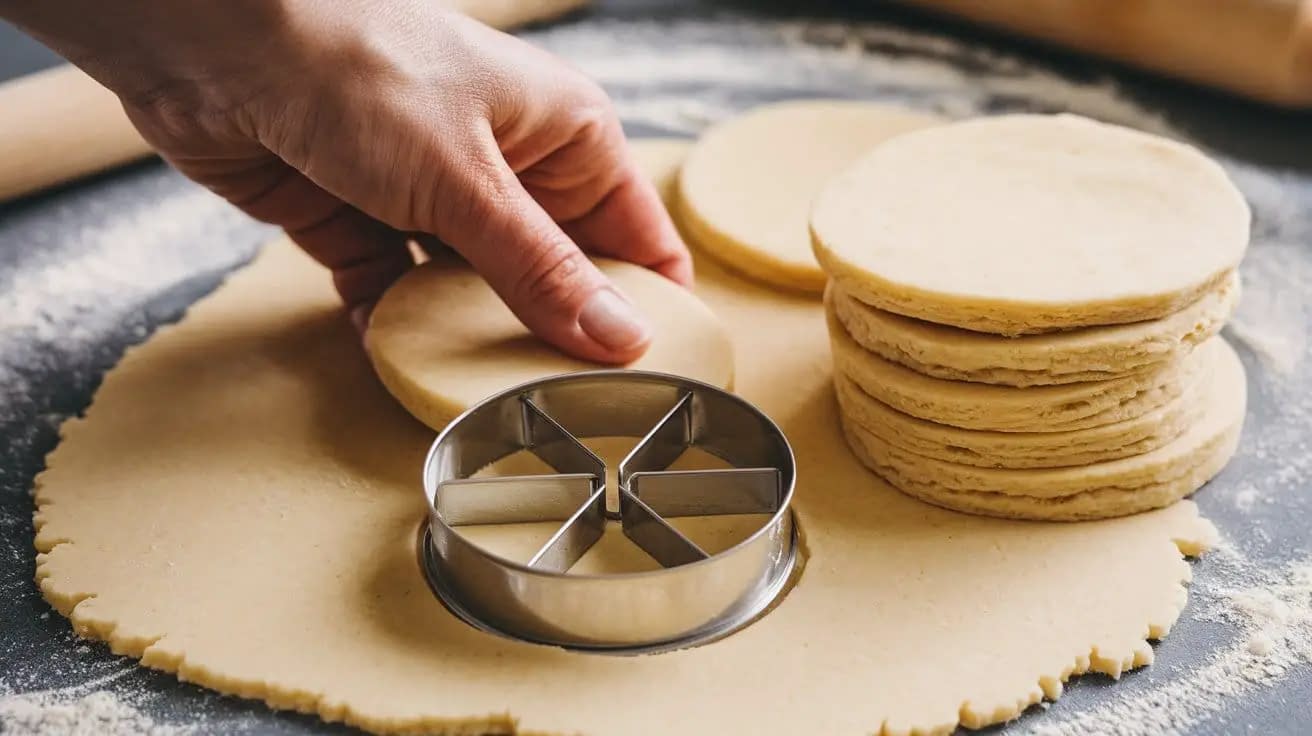
6. Shape the Biscuits
- Roll out the dough to about 1-inch thickness.
- Use a biscuit cutter or a glass to cut out your biscuits.
- Place them on a parchment-lined surface, ensuring they touch slightly (this helps them rise without spreading).
7. Prepare the Dutch Oven for Baking
If baking indoors, carefully remove the preheated Dutch oven from the oven. If outdoors, ensure it’s at the desired temperature.
8. Arrange the Biscuits
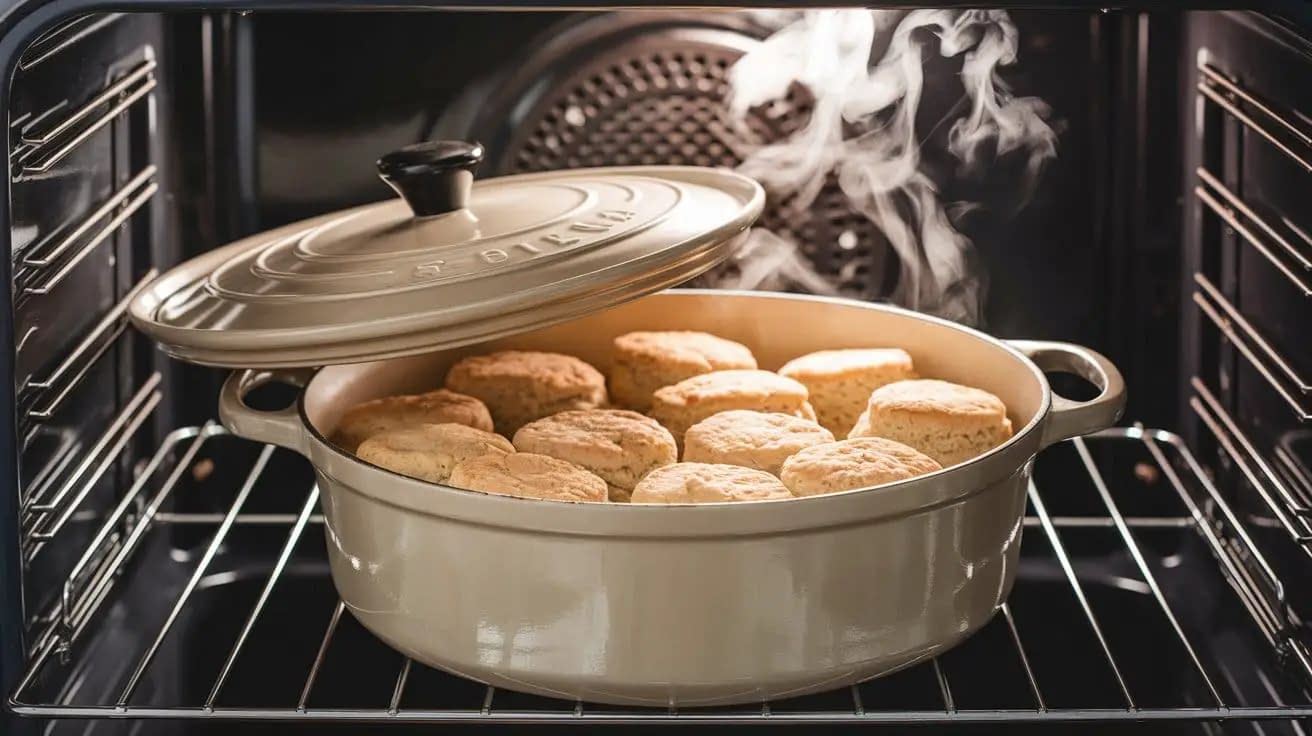
Place the biscuits in the Dutch oven, side by side, without overlapping. Cover with the lid.
9. Bake to Perfection
- Indoor Baking: Bake for 20-25 minutes, or until the tops are golden brown.
- Outdoor Baking: Adjust the cooking time as needed, typically around 20 minutes, checking for a golden crust.
10. Cooling
Once baked, use oven mitts to remove the Dutch oven from the heat source. Transfer the biscuits to a cooling rack and let them rest for 5 minutes before serving.
11. Serve and Enjoy
Serve your freshly baked Dutch oven biscuits warm with butter, honey, jam, or your favorite spread.
Tips for Perfect Biscuits Every Time
- Use Cold Ingredients: Cold butter and milk prevent the dough from becoming too soft, resulting in flakier biscuits.
- Avoid Overmixing: Mix just until the ingredients come together to maintain a tender texture.
- Preheat the Dutch Oven: Ensures even baking and a crispy exterior.
- Don’t Overcrowd: Allow space between biscuits for proper rising.
- Experiment with Flavors: Add cheese, herbs, or spices to customize your biscuits.
Variations to Elevate Your Biscuits
Cheddar and Chive Biscuits
- Add: 1 cup shredded sharp cheddar cheese and 2 tablespoons chopped fresh chives to the dry ingredients.
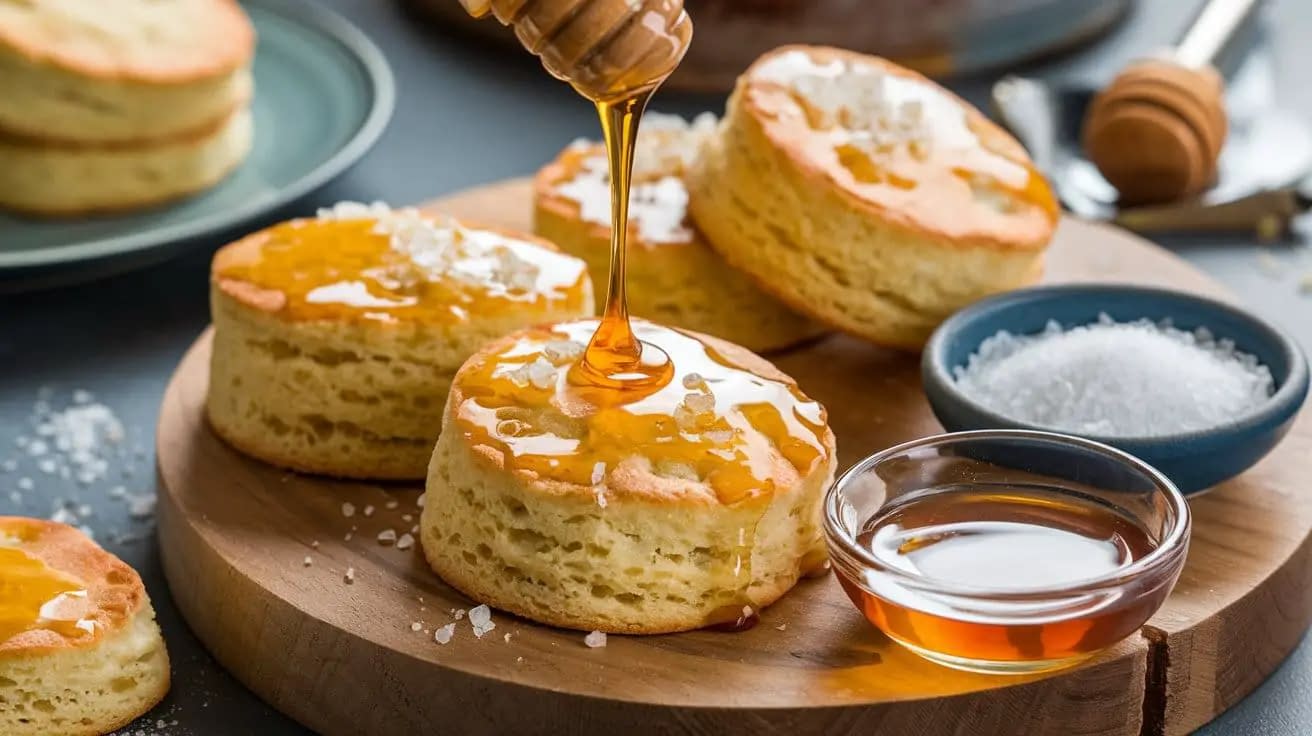
Honey-Glazed Biscuits
- Glaze: Mix 2 tablespoons honey with 1 tablespoon melted butter and brush over the warm biscuits.
Buttermilk Biscuits
- Replace: Use buttermilk instead of regular milk for a tangier flavor and extra tenderness.
Savory Herb Biscuits
- Add: 1 teaspoon dried rosemary or thyme to the dry ingredients for an aromatic twist.
Conclusion
Baking biscuits in a Dutch oven is a rewarding experience that yields delicious, bakery-quality results with a rustic charm. Whether you’re cooking indoors or embracing the great outdoors, this method ensures your biscuits are always a hit. Experiment with different flavors, share them with loved ones, and enjoy the comforting simplicity of homemade biscuits. Happy baking!
Rustic Dutch Oven Biscuits Recipe
Description
Experience the comforting warmth of freshly baked biscuits with this Rustic Dutch Oven Biscuits recipe. Originating from traditional Southern American baking, these biscuits boast a flaky exterior and a tender, buttery interior. Perfect for breakfast, brunch, or as a side to your favorite meal, cooking biscuits in a Dutch oven imparts a delightful, evenly baked texture that's hard to achieve with conventional baking methods. Whether you're an outdoor enthusiast or simply love the charm of rustic cooking, this recipe is a must-try for biscuit aficionados.
Ingredients
For the Dough:
For the Topping:
Instructions
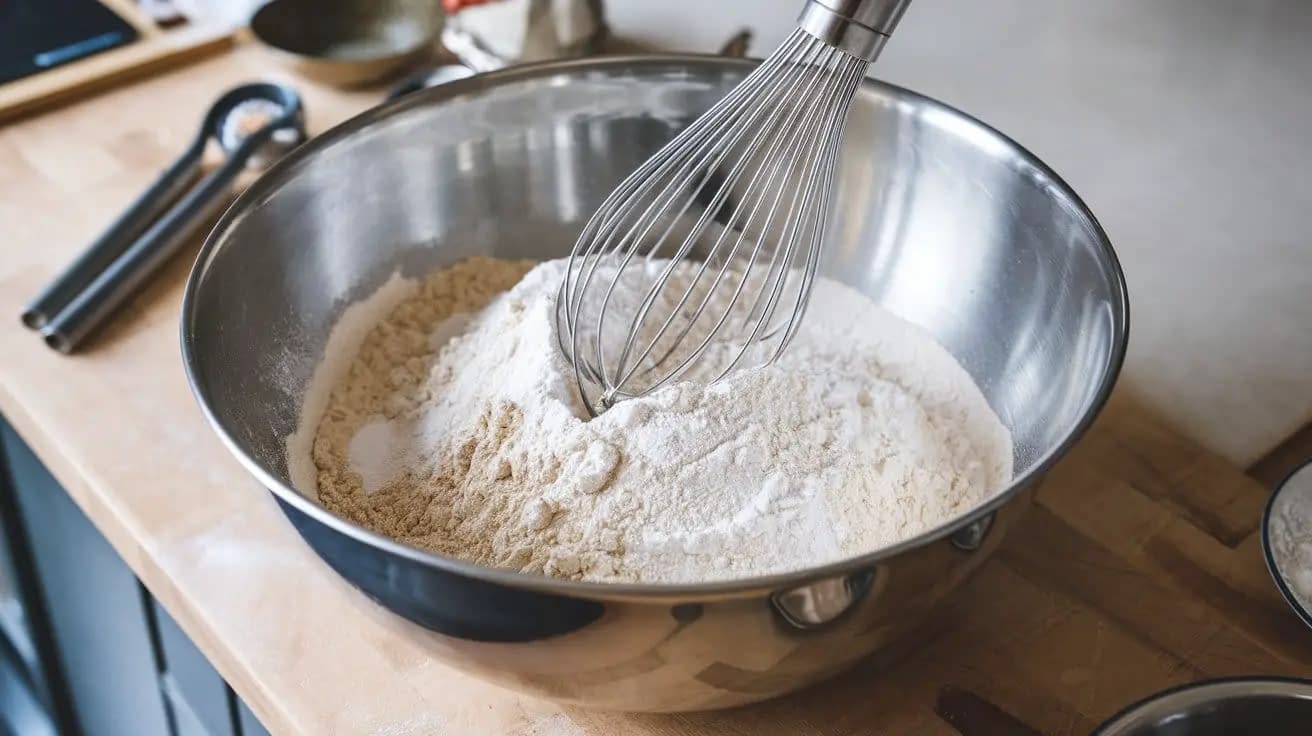
Prepare the Dry Ingredients
In a large mixing bowl, combine 4 cups of all-purpose flour, 1 tablespoon of baking powder, and 2 teaspoons of salt. Whisk together until well mixed to ensure even distribution of the leavening agent and seasoning.

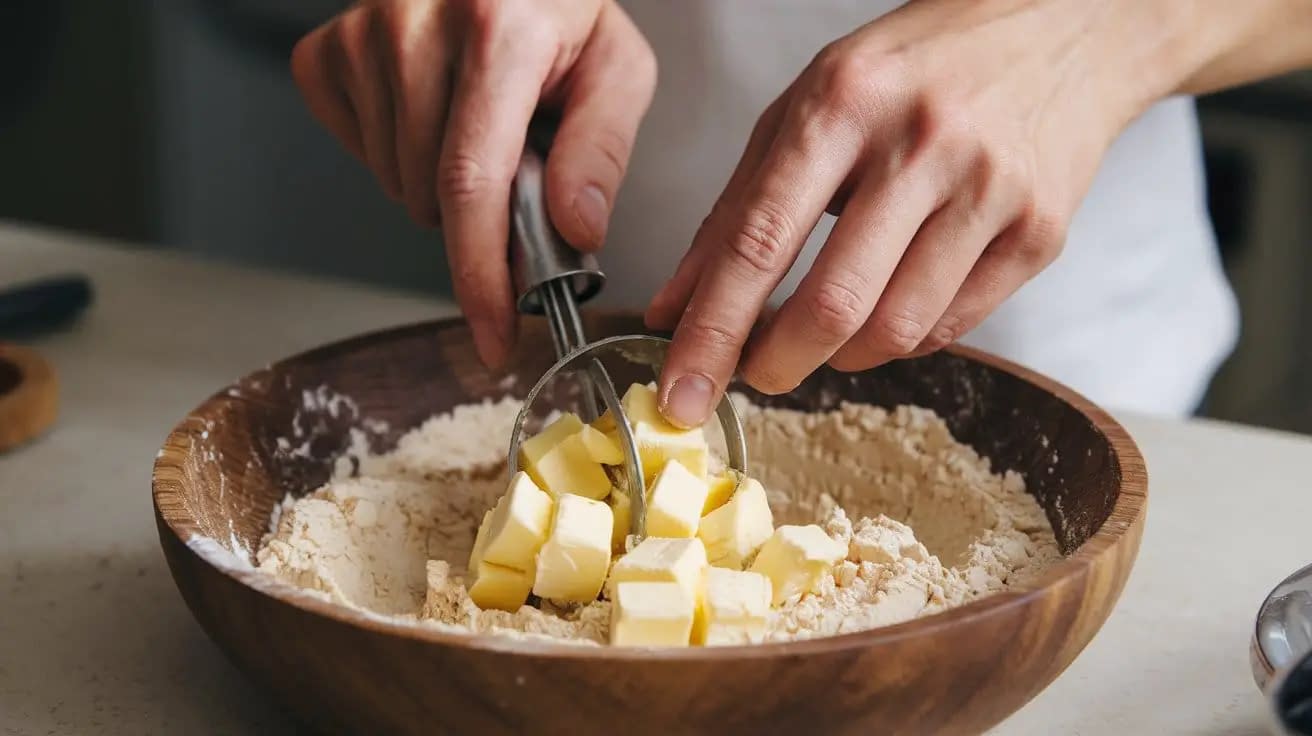
Incorporate the Butter
Add 1/2 cup of cold, cubed unsalted butter to the dry mixture. Using a pastry cutter or your fingertips, work the butter into the flour until the mixture resembles coarse crumbs with pea-sized pieces of butter remaining. This technique ensures flaky layers in the final biscuits.
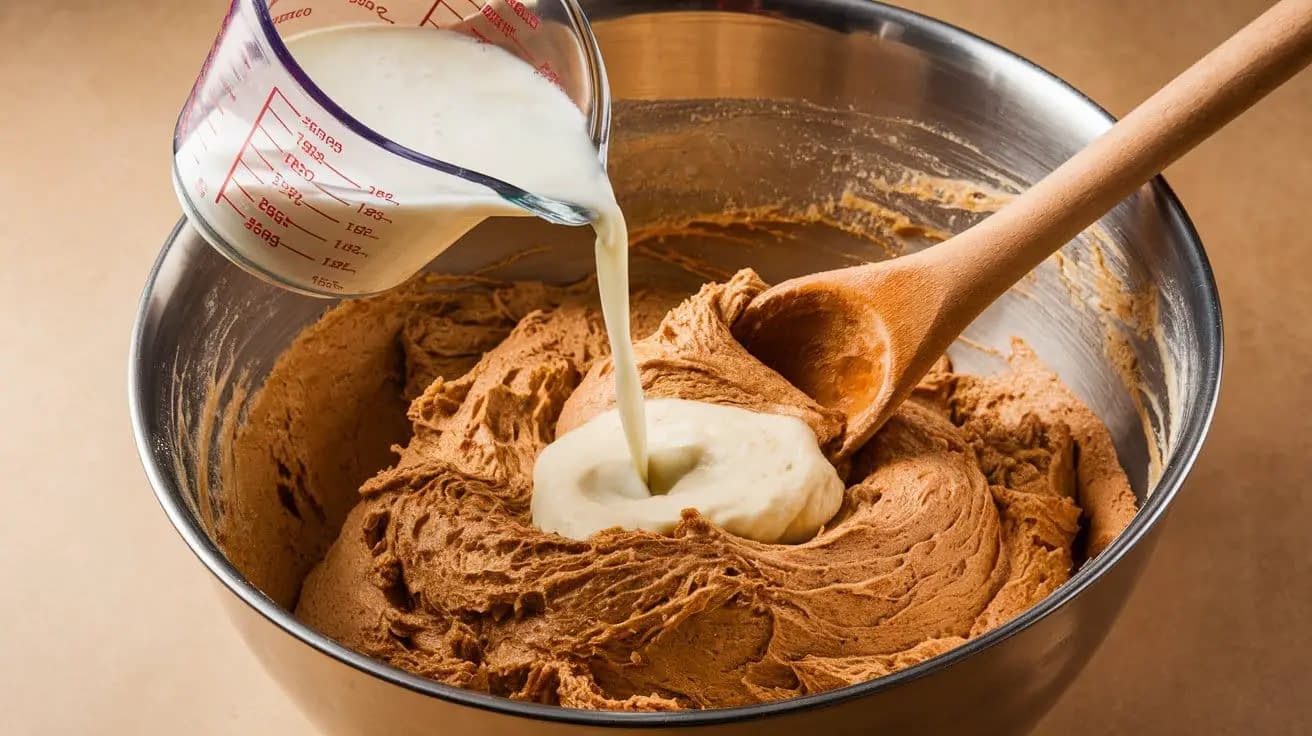
Add the Buttermilk
Gradually pour 1 3/4 cups of cold buttermilk into the mixture while stirring gently with a wooden spoon. Mix until the dough just comes together; avoid overmixing to keep the biscuits tender.
Knead the Dough
Transfer the dough onto a lightly floured surface. Gently knead it by folding the dough over itself 5-6 times until it is smooth. Pat the dough into a 1-inch thick disk to prepare for cutting.
Cut the Biscuits
Using a floured biscuit cutter, cut out biscuits from the dough, pressing straight down without twisting to ensure they rise evenly. Re-roll the scraps as needed until all dough is used. Place the cut biscuits on a floured surface, allowing them to rest briefly.
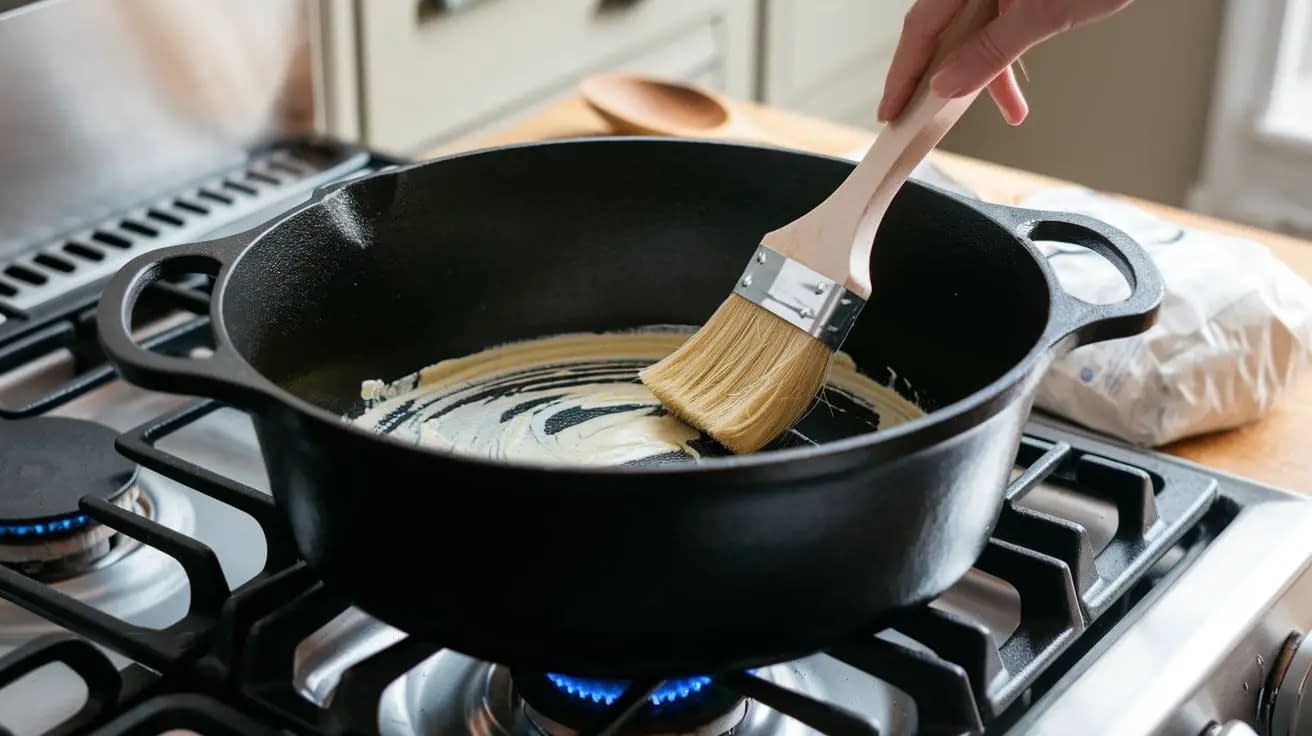
Prepare the Dutch Oven
Preheat your Dutch oven over medium heat. While heating, brush the inside with melted butter to prevent sticking and to add a rich flavor to the biscuits.
Bake the Biscuits
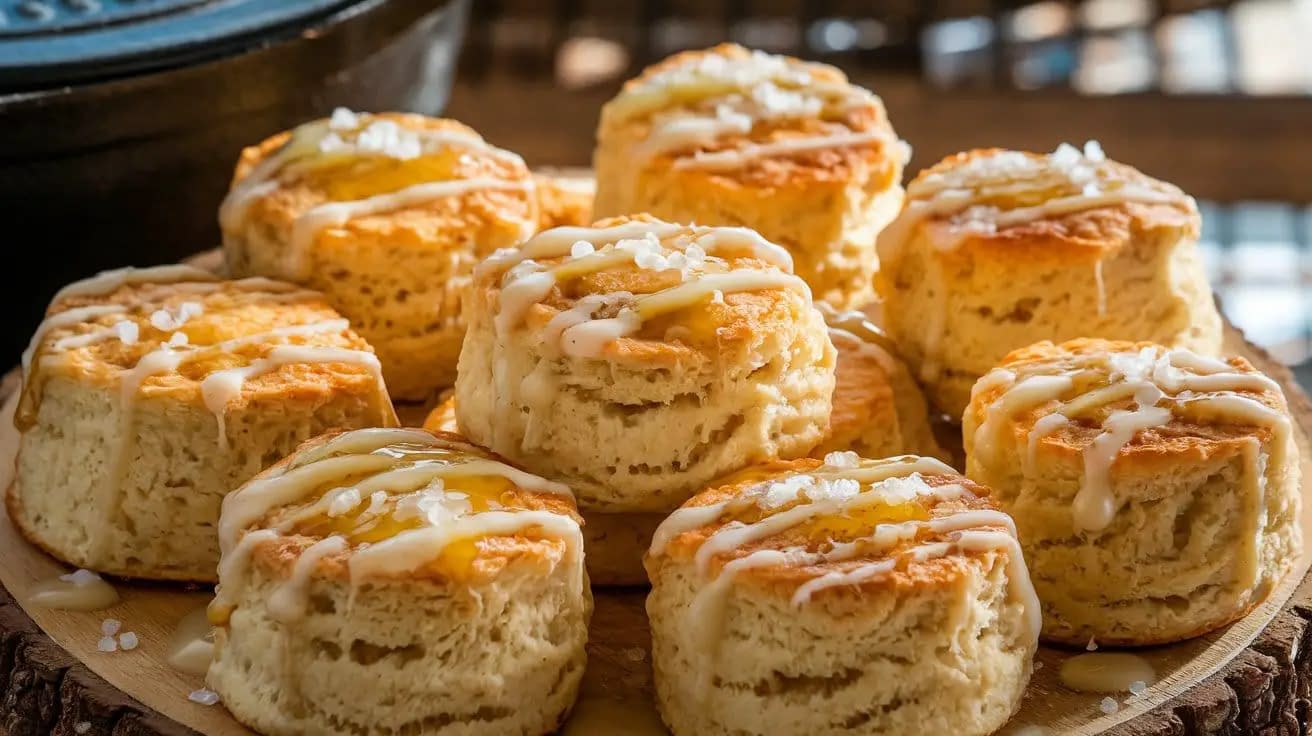
Carefully place the biscuits into the preheated Dutch oven, ensuring they have space to rise. Cover with the lid and bake at 200°C for 15 minutes. After 15 minutes, remove the lid and bake for an additional 5 minutes or until the tops are golden brown and flaky.
Apply the Topping
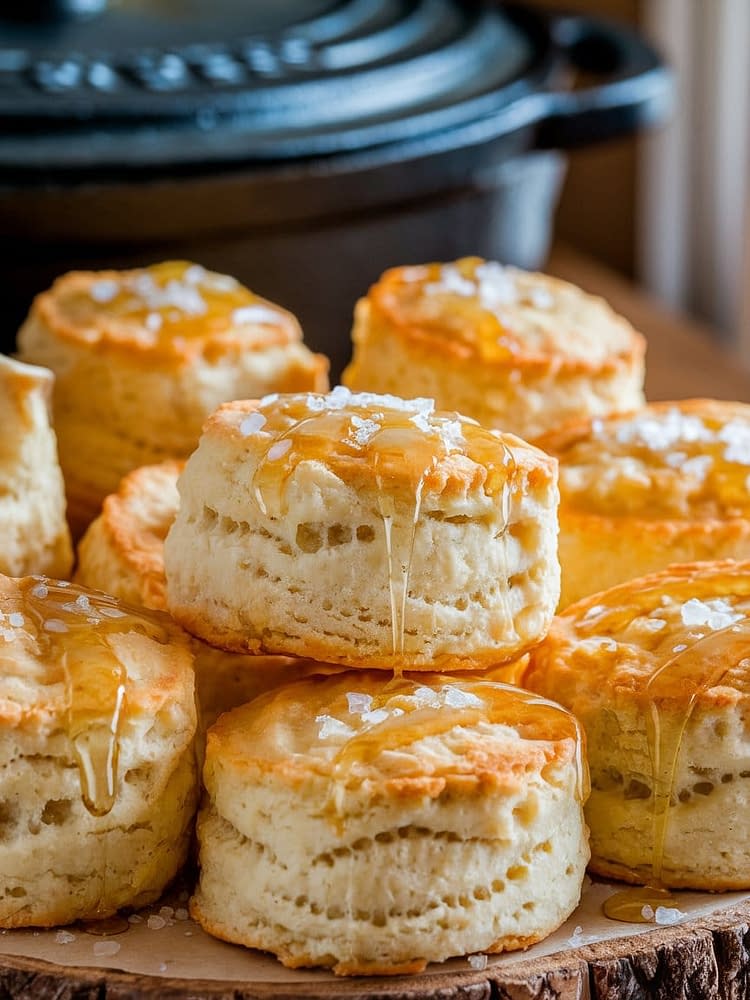
Once baked, remove the Dutch oven from heat. Brush the tops of the biscuits with 2 tablespoons of melted butter and drizzle with 1 tablespoon of honey. Sprinkle with 1 teaspoon of coarse sea salt to enhance the flavors.
Serve and Enjoy
Allow the biscuits to cool for about 10 minutes before serving. Enjoy them warm with your favorite spreads, soups, or as a delightful standalone treat.
Nutrition Facts
Servings 8
- Amount Per Serving
- Calories 372.72kcal
- % Daily Value *
- Total Fat 15.24g24%
- Saturated Fat 9.2g46%
- Cholesterol 39.05mg14%
- Sodium 250.11mg11%
- Potassium 107.28mg4%
- Total Carbohydrate 51.37g18%
- Dietary Fiber 1.69g7%
- Sugars 3.56g
- Protein 7.35g15%
- Vitamin A 124.54 IU
- Vitamin C 0.24 mg
- Calcium 167.44 mg
- Iron 3.12 mg
- Vitamin E 0.56 IU
- Vitamin K 1.45 mcg
- Thiamin 0.49 mg
- Riboflavin 0.35 mg
- Niacin 3.71 mg
- Vitamin B6 0.03 mg
- Folate 19.85 mcg
- Vitamin B12 0.08 mcg
- Phosphorus 263.42 mg
- Magnesium 17.35 mg
- Zinc 0.55 mg
* Percent Daily Values are based on a 2,000 calorie diet. Your daily value may be higher or lower depending on your calorie needs.
Note
- Cold Ingredients: Ensure that the butter and buttermilk are cold to achieve the flakiness in the biscuits.
- Overmixing: Avoid overmixing the dough to prevent tough biscuits. Mix until just combined.
- Variations:
- Cheddar Herb Biscuits: Add 1 cup of shredded cheddar cheese and 2 tablespoons of chopped fresh herbs (like rosemary or thyme) to the dough for a savory twist.
- Sweet Cinnamon Biscuits: Incorporate 2 teaspoons of cinnamon and 1/4 cup of sugar into the dry ingredients for a sweet version.
- Storage: Store leftover biscuits in an airtight container at room temperature for up to 2 days or freeze for up to 3 months. Reheat in the oven before serving.
- Serving Suggestions: Perfect with butter, jam, honey, gravy, or as a side to soups and stews.


